
I Finally Mastered the DHT11 Temperature and Humidity Sensor
Let’s be real for a second. The first time I tried to build a simple weather station for my home lab, I thought it would be a five-minute job. Plug in the sensor, upload some code, and boom—data.
I was wrong.
I spent three hours staring at a Serial Monitor that kept screaming Failed to read from DHT sensor!. I swapped wires, I blamed the code, and I almost threw my Arduino across the room. It turned out I had just ignored a simple timing issue that nobody talks about in the official datasheets.
If you are searching for “DHT11 temperature and humidity sensor” because you actually want to build something—not just read boring, theoretical definitions about what IoT means. Instead of just reading that IoT is ‘a network of connected devices,’ we are going to actually put a sensor on your home network and see it talk to your phone in real-time.
I’ve designed this guide for two types of makers:
- The “Budget Builder”: Using the classic Arduino Nano.
- The “Feature Lover”: Using the powerful Arduino UNO R4 WiFi (we’ll actually host a website inside the board!).
Let’s get your hands dirty.
🛠️ The Hardware: What I Actually Use
I’ve tested dozens of sensors, but the DHT11 stays in my drawer for one reason: it’s cheap and “good enough” for indoor projects.
My Component List
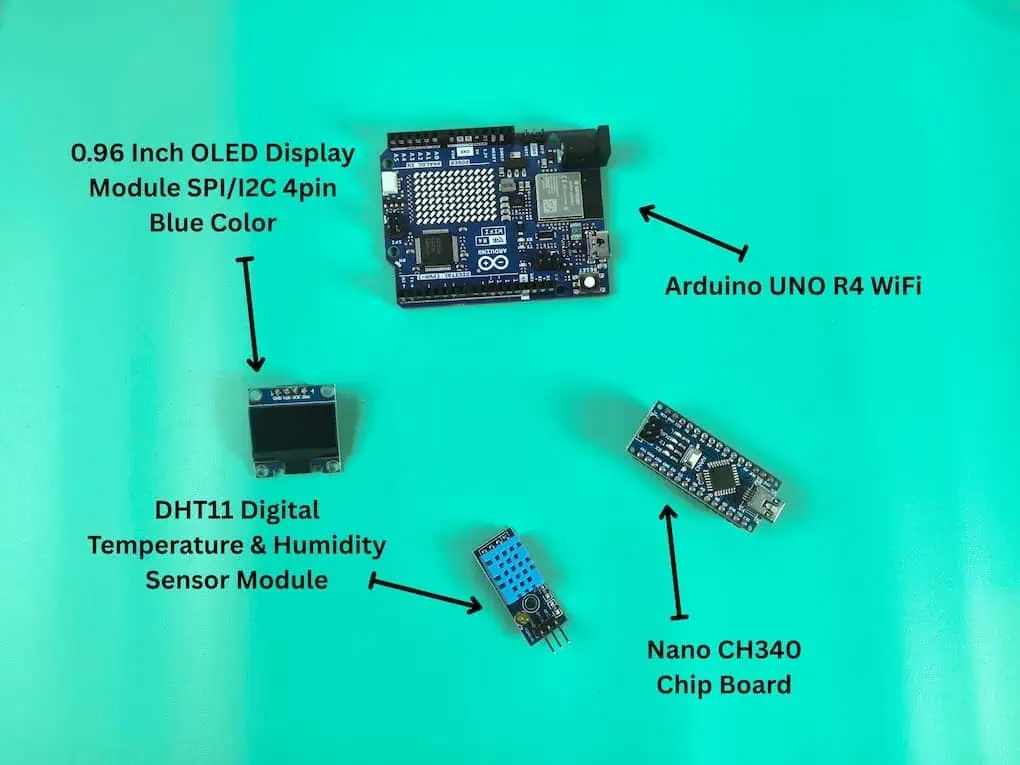
- Sensor: DHT11 (The blue one with the grid).
- Display: 0.96 Inch OLED Display (I2C 4-pin). Trust me, debugging without a screen is a nightmare.
- Controller: Arduino Nano (for the budget build) OR Arduino UNO R4 WiFi. If you are still deciding which brain to use for your project, I’ve put together a complete microcontroller development boards guide to help you choose the right one for your specific needs.
- Breadboard: A medium or mini breadboard. Since both the sensor and the screen need to share the same 5V and GND pins from your Arduino, the breadboard acts as your “power strip” to distribute electricity.
- Wires: Jumper wires (Male-to-Female and Male-to-Male).
⚠️ Important Note for Arduino Nano: Most modern gadgets use USB-C, but the classic Nano uses a Mini-B USB cable. I’ve seen many beginners unbox their board only to realize they don’t have the right cable to plug it into their laptop. Make sure you add a Mini-B USB cable to your cart!
Pro Tip: If you bought the bare DHT11 sensor (4 pins) instead of the module (3 pins on a PCB), don’t forget a 10k resistor between VCC and Data. I missed this once and got weird, fluctuating readings for days.
⚠️ Wiring: Don’t Fry Your Board Like I Did
I once smoked an OLED display because I swapped VCC and GND. It smelled like burning plastic and sadness. Don’t be me.
Here is the exact wiring I use for both setups. Note that the OLED uses I2C, so the pins change depending on your board.
Connection Table
| Component Pin | Arduino Nano Pin | Arduino UNO R4 WiFi Pin | Why? |
| DHT11 VCC | 5V | 5V | Power source. |
| DHT11 GND | GND | GND | Ground reference. |
| DHT11 DATA | D2 | D2 | Where the magic happens. |
| OLED VCC | 5V | 5V | Powers the screen. |
| OLED GND | GND | GND | Ground. |
| OLED SCK | A5 | SCL (near AREF) | Serial Clock line. |
| OLED SDA | A4 | SDA (near AREF) | Serial Data line. |
Note: On the Arduino UNO R4, the SDA/SCL pins are separate, usually near the USB port or the AREF pin. Look closely at the silk screen on your board!
💾 The “Must-Have” Libraries
Before we code, we need tools. I use the Adafruit libraries because they are battle-tested. I’ve tried lighter libraries, but they often fail when you add WiFi.
To get these tools ready, you’ll need to use the built-in manager. Open your Arduino IDE Library Manager (Tools > Manage Libraries or Ctrl+Shift+I) and install:
- DHT sensor library by Adafruit.
- Adafruit Unified Sensor (required for the above).
- Adafruit SSD1306 (for the OLED).
- Adafruit GFX Library.
Case Study 1: The Low-Budget Build (Arduino Nano)
Goal: Display Temp/Humidity on OLED and Serial Monitor.
This is perfect if you just want a small desk gadget. I built one of these to monitor humidity in my 3D printing filament box.
The Code (Nano Version)
I’ve added comments explaining exactly what’s happening.
C++
#include <SPI.h>
#include <Wire.h>
#include <Adafruit_GFX.h>
#include <Adafruit_SSD1306.h>
#include <DHT.h>

// --- CONFIGURATION ---
#define SCREEN_WIDTH 128
#define SCREEN_HEIGHT 64
#define OLED_RESET    -1
#define DHTPIN 2     // Pin where DHT11 is connected
#define DHTTYPE DHT11

// Initialize objects
Adafruit_SSD1306 display(SCREEN_WIDTH, SCREEN_HEIGHT, &Wire, OLED_RESET);
DHT dht(DHTPIN, DHTTYPE);

void setup() {
  Serial.begin(9600);

  // 1. Initialize DHT Sensor
  dht.begin();
  Serial.println(F("DHT11 Test Begin..."));

  // 2. Initialize OLED Display
  // If this fails, check your wiring! Address is usually 0x3C
  if(!display.begin(SSD1306_SWITCHCAPVCC, 0x3C)) {
    Serial.println(F("SSD1306 allocation failed. Check connections!"));
    for(;;); // Don't proceed, loop forever
  }

  display.clearDisplay();
  display.setTextColor(WHITE);
}

void loop() {
  delay(2000); // DHT11 is slow! Wait 2 seconds between readings.

  float h = dht.readHumidity();
  float t = dht.readTemperature();

  // --- ERROR CHECKING (Crucial!) ---
  if (isnan(h) || isnan(t)) {
    Serial.println(F("Failed to read from DHT sensor! Check wires!"));

    // Show error on OLED so you don't need the laptop connected
    display.clearDisplay();
    display.setCursor(0, 0);
    display.setTextSize(1);
    display.println("Sensor Error!");
    display.println("Check Wiring");
    display.display();
    return;
  }

  // --- SERIAL OUTPUT ---
  Serial.print(F("Humidity: "));
  Serial.print(h);
  Serial.print(F("%  Temperature: "));
  Serial.print(t);
  Serial.println(F("°C"));

  // --- OLED OUTPUT ---
  display.clearDisplay();

  // Title
  display.setTextSize(1);
  display.setCursor(0,0);
  display.println("Room Monitor");

  display.drawLine(0, 10, 128, 10, WHITE); // Make it look fancy

  // Temperature
  display.setTextSize(2);
  display.setCursor(0,15);
  display.print("T:");
  display.print((int)t);
  display.print((char)247); // Degree symbol
  display.println("C");

  // Humidity
  display.setCursor(0,40);
  display.print("H:");
  display.print((int)h);
  display.println("%");

  display.display();
}
What to watch out for:
When I first ran this, my OLED remained black. The Catch? My cheap OLED module had a different I2C address (0x3D instead of 0x3C). If yours doesn’t work, try swapping 0x3C to 0x3D in the code.
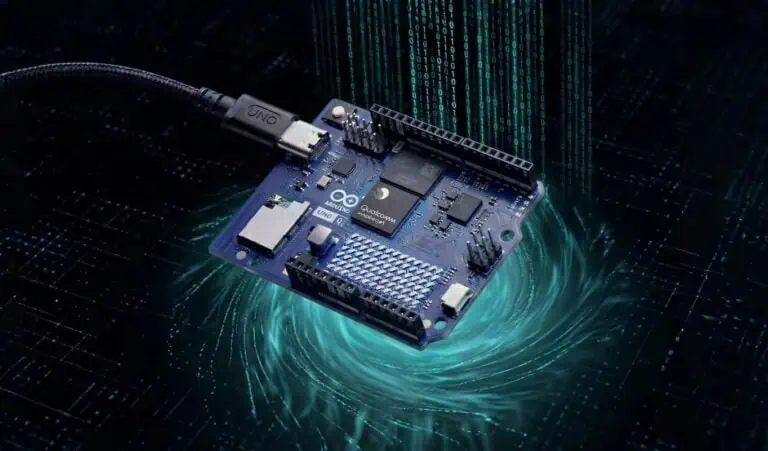
Case Study 2: The “Pro” Build (Arduino UNO R4 WiFi)
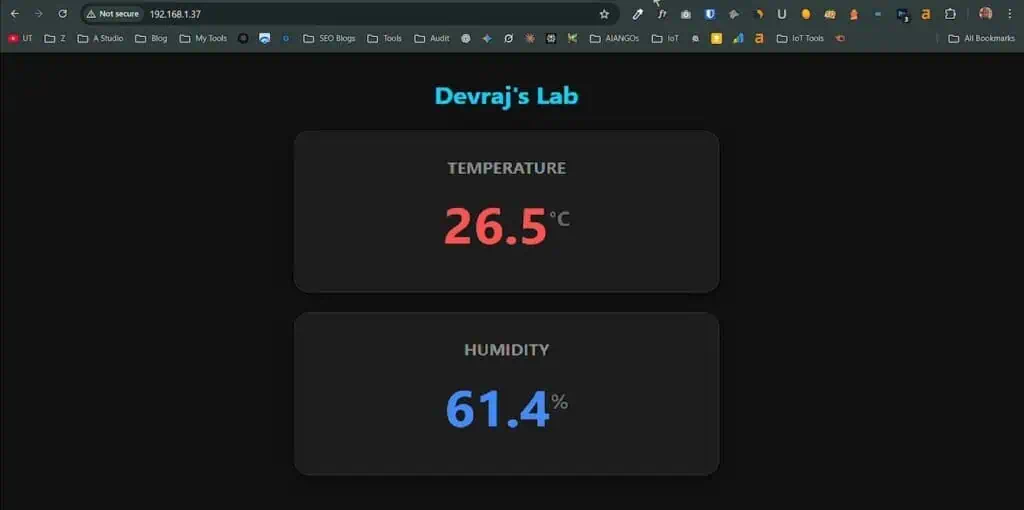
Goal: Host a real-time Dashboard on the R4 itself + OLED Backup.
The UNO R4 WiFi is a game-changer for makers. Its built-in WiFi chip is powerful enough that we can host a webpage directly on the board itself—no external cloud required.
Imagine checking your room temperature from your phone’s browser without installing any app. That’s what we are doing here.
The Code (R4 WiFi Web Server)
Update: You need to enter your WiFi credentials at the top.
C++
#include "WiFiS3.h"
#include <U8g2lib.h>
#include <Wire.h>
#include <DHT.h>
// --- 1. WIFI CREDENTIALS ---
char ssid[] = "Your WiFi Name";
// Make sure there are no hidden spaces at the end of this password!
char pass[] = "Your WiFi Password"; //wifi must be 2.4GHz as 5GHz not supported
// --- 2. HARDWARE CONFIG ---
#define DHTPIN 2
#define DHTTYPE DHT11
// --- 3. OBJECTS ---
WiFiServer server(80);
DHT dht(DHTPIN, DHTTYPE);
// The "Snow Fix" Driver for your specific OLED screen
U8G2_SH1106_128X64_NONAME_F_HW_I2C u8g2(U8G2_R0, /* reset=*/ U8X8_PIN_NONE);
// Global variables
float t = 0.0;
float h = 0.0;
unsigned long lastSensorRead = 0;
void setup() {
Serial.begin(9600);
// -- A. Start Display --
u8g2.begin();
u8g2.setFont(u8g2_font_ncenB08_tr);
u8g2.clearBuffer();
u8g2.drawStr(0, 10, "System Booting...");
u8g2.sendBuffer();
// -- B. Start Sensor --
dht.begin();
// -- C. Connect to WiFi --
Serial.println("\n--------------------------------");
Serial.print("Connecting to: "); Serial.println(ssid);
u8g2.drawStr(0, 25, "Connecting WiFi...");
u8g2.sendBuffer();
WiFi.begin(ssid, pass);
// Wait for Connection
while (WiFi.status() != WL_CONNECTED) {
delay(500);
Serial.print(".");
}
// --- THE FIX: Wait for Valid IP Address (No more 0.0.0.0) ---
Serial.println("\nAuth Success! Waiting for IP...");
while (WiFi.localIP() == IPAddress(0,0,0,0)) {
delay(100);
Serial.print(".");
}
server.begin();
// -- D. Show Success on Serial Monitor --
Serial.println("\n\n=================================");
Serial.println(" SERVER READY! ");
Serial.print(" OPEN THIS IP: http://");
Serial.println(WiFi.localIP());
Serial.println("=================================\n");
// -- E. Show Success on OLED --
u8g2.clearBuffer();
u8g2.drawStr(0, 10, "WiFi Connected!");
// Print IP on OLED
char ipStr[20];
IPAddress ip = WiFi.localIP();
sprintf(ipStr, "%d.%d.%d.%d", ip[0], ip[1], ip[2], ip[3]);
u8g2.drawStr(0, 25, ipStr);
u8g2.sendBuffer();
}
void loop() {
// --- PART 1: Read Sensor (Every 2 Seconds) ---
if (millis() - lastSensorRead > 2000) {
lastSensorRead = millis();
float newT = dht.readTemperature();
float newH = dht.readHumidity();
// Check if data is valid
if (!isnan(newT) && !isnan(newH)) {
t = newT;
h = newH;
// Update OLED Local Display
u8g2.clearBuffer();
u8g2.setFont(u8g2_font_ncenB08_tr);
u8g2.drawStr(0, 10, "Devraj's Lab");
// Draw Temp
u8g2.setFont(u8g2_font_helvB12_tr);
u8g2.setCursor(0, 35);
u8g2.print("Temp: "); u8g2.print(t, 1); u8g2.print(" C");
// Draw Hum
u8g2.setCursor(0, 55);
u8g2.print("Hum: "); u8g2.print(h, 1); u8g2.print(" %");
u8g2.sendBuffer();
}
}
// --- PART 2: Web Server (The Dashboard) ---
WiFiClient client = server.available();
if (client) {
boolean currentLineIsBlank = true;
while (client.connected()) {
if (client.available()) {
char c = client.read();
if (c == '\n' && currentLineIsBlank) {
// Send HTTP Header
client.println("HTTP/1.1 200 OK");
client.println("Content-Type: text/html");
client.println("Connection: close");
client.println("Refresh: 5"); // Auto-refresh page every 5s
client.println();
// Send HTML Dashboard
client.println("<!DOCTYPE HTML><html><head>");
client.println("<meta name='viewport' content='width=device-width, initial-scale=1'>");
client.println("<title>IoT Monitor</title>");
client.println("<style>");
client.println("body { font-family: 'Segoe UI', sans-serif; background-color: #121212; color: white; text-align: center; margin: 0; padding-top: 30px;}");
client.println(".card { background: #1e1e1e; border-radius: 15px; width: 85%; max-width: 350px; margin: 20px auto; padding: 25px; box-shadow: 0 4px 15px rgba(0,0,0,0.5); border: 1px solid #333; }");
client.println("h1 { color: #00d2ff; font-size: 24px; }");
client.println("h2 { color: #888; font-size: 16px; text-transform: uppercase; margin-top: 0; }");
client.println(".value { font-size: 50px; font-weight: bold; margin: 10px 0; }");
client.println(".unit { font-size: 20px; color: #666; vertical-align: super; }");
client.println(".temp-val { color: #ff5252; }");
client.println(".hum-val { color: #448aff; }");
client.println("</style></head>");
client.println("<body>");
client.println("<h1>Devraj's Lab</h1>");
// Real Temperature Card
client.println("<div class='card'><h2>Temperature</h2>");
client.println("<div class='value temp-val'>");
if(isnan(t)) client.print("--"); else client.print(t, 1);
client.println("<span class='unit'>°C</span></div></div>");
// Real Humidity Card
client.println("<div class='card'><h2>Humidity</h2>");
client.println("<div class='value hum-val'>");
if(isnan(h)) client.print("--"); else client.print(h, 1);
client.println("<span class='unit'>%</span></div></div>");
client.println("</body></html>");
break;
}
if (c == '\n') currentLineIsBlank = true;
else if (c != '\r') currentLineIsBlank = false;
}
}
delay(10);
client.stop();
}
}How to View Your Dashboard
- Upload the code.
- Open the Serial Monitor (Tools > Serial Monitor)/(Ctrl + Shift + M) and set the Baud rate to 9600.
- Wait for the IP Address to appear (e.g.,
192.168.1.x) <- Check the Serial Monitor, as it will provide the specific IP address needed to access your live dashboard. - Type that IP address into your phone or browser.
- Victory. You should see a clean card-style interface showing your data.
🚀 Devraj’s Pro-Tips for a Smooth Build
Most tutorials skip the tiny details, but I want to make sure your project works on the very first try. Here are three “insider secrets” I discovered while perfecting this build:
1. The OLED “Snow” Fix: Some 0.96″ screens are labeled SSD1306 but actually run on the SH1106 driver. If you see static or “snow” on your screen, don’t worry! My code uses the U8g2 library which handles both types perfectly. I’ve pre-configured the code to be compatible with the most common modules.
2. Stable WiFi Connection: The Arduino R4 is extremely fast. To prevent it from trying to start before your router is ready, I’ve added a “Smart Wait” loop in the code. This ensures the board gets a proper IP address before it launches your dashboard.
3. Precision is Key: When entering your WiFi password, ensure no extra spaces sneaked inside the quotes. Arduino is very strict—it treats a space as an actual character, which is the #1 reason for connection headaches.
4. The “Cable Trap”: We live in a USB-C world now, but the Arduino Nano is a classic. It requires a Mini-B USB cable (the thicker, boxy one). Important Note for Arduino Nano: If you only have phone chargers at home, you probably don’t have this cable. Check your drawers before you start, or you’ll be stuck waiting for another delivery just to upload your first sketch!
Troubleshooting: “Real Project Experience”
I want to save you the headaches I had. Here are the 3 most common failures I see in my workshops.
1. The “NaN” Error
If your serial monitor says Humidity: NaN %, it stands for “Not a Number.”
- The Cause: Loose wiring.
- My Fix: I usually wiggle the jumper wires at the sensor end. 90% of the time, the female header on the wire is loose.
2. The Slow Update
- The Problem: You change the code to read every 100ms, and the sensor crashes.
- The Reality: The DHT11 is slow. It needs at least 1-2 seconds to recover between readings. Don’t rush it.
3. The “Library Not Found”
- The Cause: You installed the DHT library but forgot the “Adafruit Unified Sensor” library.
- The Fix: Go back to library manager and install it. The code won’t compile without it.
Bottom Line
You now have a working temperature monitor. If you used the Nano, you have a solid offline tool. If you used the R4, you just built your first web server.
Here is my challenge to you:
The code currently auto-refreshes the webpage every 5 seconds (client.println(“Refresh: 5”);). Can you change it to 10 seconds to save power?
Let me know in the comments if you managed to get the web server running on the first try!
Devraj
❓ Frequently Asked Questions (The “Real Talk” Edition)
My Serial Monitor says “Connected” but the IP is 0.0.0.0. What happened?
This is a classic Arduino UNO R4 speed issue. I’ve already solved this in the code using a ‘Smart Wait’ loop—check out Pro-Tip #2 above to see exactly how it works. If you still see 0.0.0.0, just hit the Reset button on the board once.
I see “Moving Snow” or static on my screen instead of text. Is my OLED broken?
Probably not! Most 0.96″ OLEDs are sold as “SSD1306,” but many actually use the SH1106 driver. They look identical but speak different “languages.” The Adafruit library often fails here, which is why I use the U8g2 library in this project—it handles these “fake” chips perfectly without the static.
Can I access this dashboard while I’m at the office or on mobile data?
Not with this specific setup. Since we are hosting the server locally on the R4, your phone and the Arduino must be on the same WiFi (“raj”). If you want global access, you would need to use Arduino IoT Cloud, but for a private, fast home-lab setup, this local method is much more secure.
Why does the Temperature/Humidity only update every few seconds?
The DHT11 is a “slow” sensor. If you try to read it every 100ms, the data will crash or return “NaN.” It needs at least 2 seconds of “rest” between readings to give you an accurate result.
My browser says “Connection Refused” when I enter the IP.
Double-check that you are typing http:// and not https://. Modern browsers try to force a secure connection, but the Arduino R4 only supports standard HTTP. Also, ensure no extra spaces sneaked into your WiFi password in the code.

I’ve been struggling with this for hours with other tutorials. Yours worked 1st time! Thanks