RFID Based Attendance System Using ESP32 with Firebase and Google Sheets
What You’ll Build in This Project:
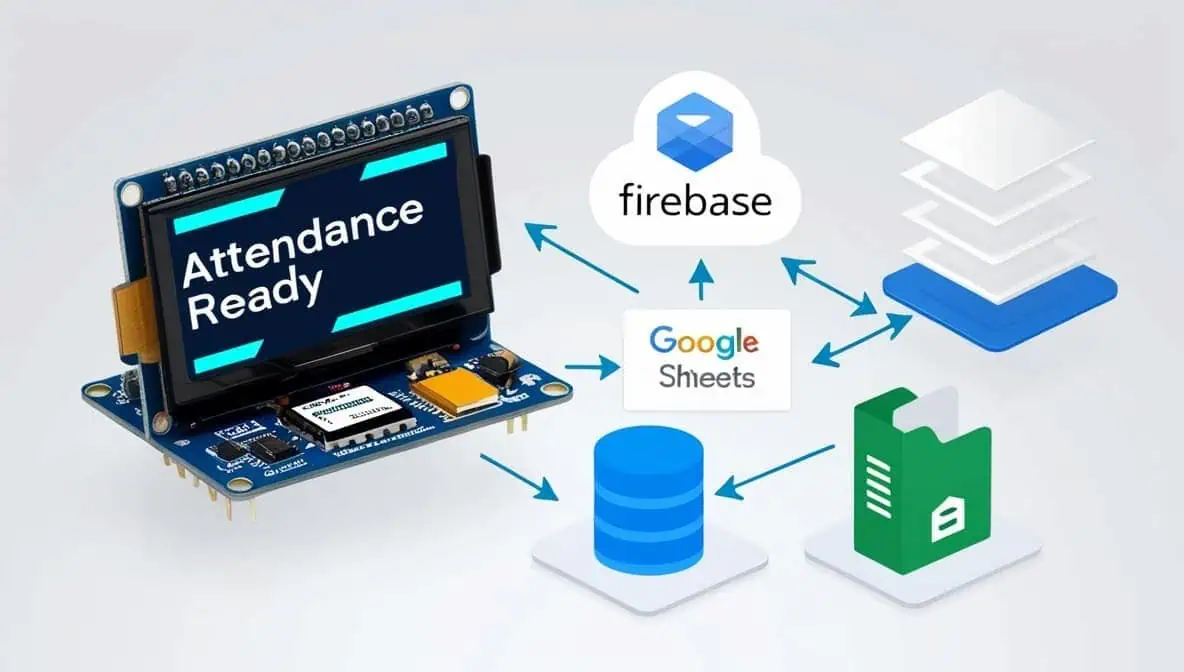
The system reads RFID tags and uploads attendance data instantly to Firebase and Google Sheets, offering secure storage and easy reporting. It’s beginner-friendly with clear steps, making it simple to build.
The user selects ESP32 for its low cost (about 350 rupees) and built-in Wi-Fi, which supports real-time cloud syncing. Its powerful dual-core processor and Arduino IDE support make it ideal for affordable, scalable RFID attendance projects.
How the system tracks attendance
The ESP32 reads each RFID scan and sent in real time to both cloud databases, stamped with date and time. The system auto-retries if Wi-Fi drops, blocks unauthorized scans, and lets admins view up-to-date attendance from anywhere.
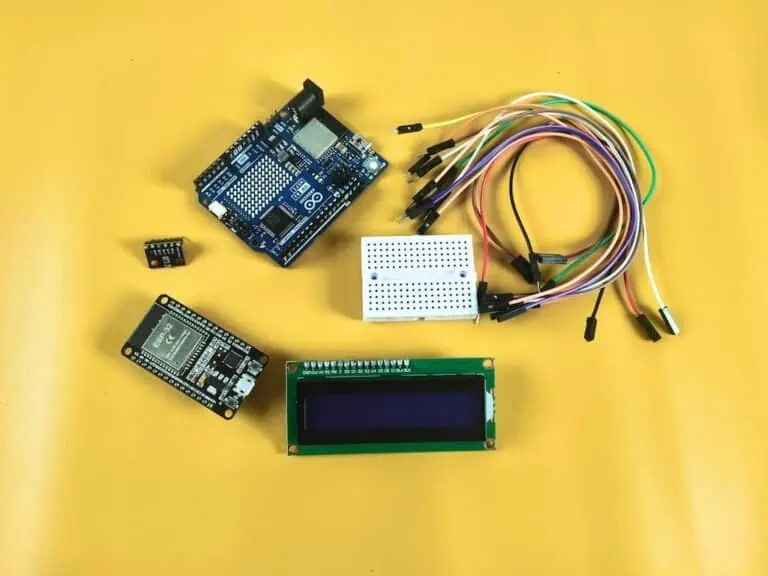
Components and Tools Required
Hardware list (ESP32, MFRC522 RFID module, etc.)
- ESP32 microcontroller board
- MFRC522 RFID reader module
- RFID cards or tags
- Jumper wires
- Breadboard or PCB for connections
- Optional: OLED or LCD display for feedback
All components are low-cost and available online or at electronics stores, letting you build this system on a student budget.
Software list (Arduino IDE, libraries)
- Arduino IDE (free download)
- ESP32 board support via Board Manager
- MFRC522 library for RFID
- WiFi and HTTPClient libraries for networking
- Optionally, Adafruit SSD1306 or LCD library for display
These libraries are free, well-supported, and make coding much faster and easier for all levels of users.
Cloud accounts (Firebase, Google Sheets)
- Free Firebase account for realtime database storage
- Free Google Sheets account via Google
- Both accounts are easy to set up and provide secure cloud hosting for attendance logs
No paid service needed, and setup can be completed in minutes with a standard Google login.
System Circuit Design and Wiring
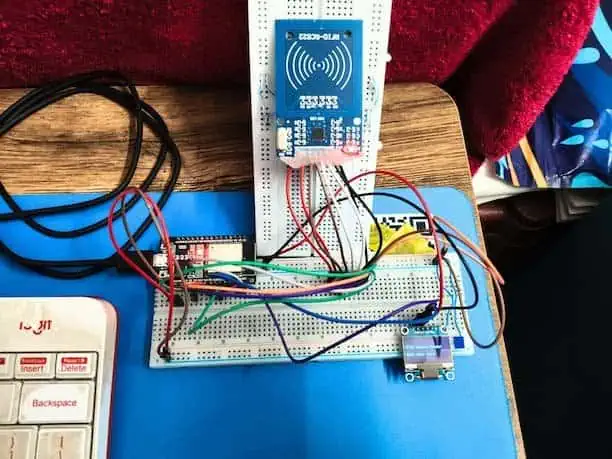
MFRC522 RFID Module to ESP32 NodeMCU 30-Pin
| RFID Module Pin | ESP32 Pin Label | Description |
|---|---|---|
| VCC | 3V3 | Power (3.3V only) |
| GND | GND | Ground |
| RST | D4 | Reset pin |
| IRQ | Not connected | Leave empty |
| MISO | D19 | Master In Slave Out |
| MOSI | D23 | Master Out Slave In |
| SCK | D18 | Serial Clock |
| SDA/SS | D5 | Slave Select |
0.96″ OLED Display (I2C) to ESP32 NodeMCU
| OLED Pin | ESP32 Pin Label | Description |
|---|---|---|
| GND | GND | Ground |
| VDD | 3V3 | Power (3.3V) |
| SCK | D22 | I2C Clock |
| SDA | D21 | I2C Data |
Visual Wiring Diagram:
ESP32 NodeMCU 30-Pin
│
├── 3V3 ──┬── RFID VCC
│         └── OLED VDD
│
├── GND ──┬── RFID GND
│         └── OLED GND
│
├── D4 ─────── RFID RST
├── D5 ─────── RFID SDA/SS
├── D18 ────── RFID SCK
├── D19 ────── RFID MISO
├── D21 ────── OLED SDA
├── D22 ────── OLED SCK
└── D23 ────── RFID MOSI
Pin Definitions for Arduino Code:
// RFID pins
#define RST_PIN 4    // D4
#define SS_PIN 5     // D5
// MISO = D19 (GPIO19)
// MOSI = D23 (GPIO23)
// SCK = D18 (GPIO18)

// OLED pins (I2C)
#define OLED_SDA 21  // D21
#define OLED_SCL 22  // D22
Double-Check Your Connections
Before powering on, verify:
- ✅ RFID VCC and OLED VDD both go to 3V3 (NOT 5V)
- ✅ All GND pins are connected together
- ✅ RFID RST is on D4 (separate from OLED)
- ✅ OLED SCK on D22, SDA on D21
- ✅ RFID SPI pins: D5, D18, D19, D23
- ✅ All wires are firmly inserted (wiggle test them)
Check Our ESP32 Pinout Guide: https://learniot.in/esp32-pinout-reference/
Setting Up Arduino IDE and ESP32
Adding ESP32 board to Arduino IDE
Adding ESP32 board to Arduino IDE:
- Open Arduino IDE
- Go to File → Preferences
- Add this URL to “Additional Board Manager URLs”:
https://raw.githubusercontent.com/espressif/arduino-esp32/gh-pages/package_esp32_index.json - Go to Tools → Board → Board Manager
- Search “ESP32” and install “ESP32 by Espressif Systems“
- Select Tools → Board → ESP32 Arduino → ESP32 Dev Module
Installing required libraries (MFRC522, WiFi, HTTPClient)
Go to Sketch → Include Library → Manage Libraries, then install:
- MFRC522 (for RFID)
- Adafruit GFX Library (for OLED)
- Adafruit SSD1306 (for OLED)
- WiFi (built-in with ESP32)
- HTTPClient (built-in with ESP32)
- ArduinoJson (for Firebase/Sheets data formatting)
Common setup issues and fixes
If you don’t see the ESP32 board in the list, double-check the Board Manager URL and install updates. If the COM port isn’t detected or uploads fail, install the CP2102 or CH340 driver (depending on your ESP32 model). Press and hold the “BOOT” button during upload if you see a “Timeout” or “Failed to connect” error. A quick IDE restart often solves library issues—it’s usually something small!.
Firebase and Google Sheets Integration
Creating Firebase Realtime Database
- Go to firebase.google.com
- Create new project
- Enable Realtime Database
- Set rules to test mode (for now)
- Copy your Database URL and API Key
Setting up Google Sheets API:
Step 1: Prepare Google Sheet
- Create new Google Sheet with columns in Row 1:
| Name | Card ID | Date | Time |
Step 2: Add Apps Script:
function doGet(e) {
  return handleRequest(e);
}

function doPost(e) {
  return handleRequest(e);
}

function handleRequest(e) {
  try {
    var sheet = SpreadsheetApp.getActiveSpreadsheet().getSheetByName("Sheet1");
    var params = e.parameter;

    var name = params.name || "Unknown";
    var uid = params.uid || "Unknown";
    var timestamp = params.time || new Date().toLocaleTimeString();
    var date = new Date().toLocaleDateString();

    // Append new row: Name, Card ID, Date, Time
    sheet.appendRow([name, uid, date, timestamp]);

    return ContentService.createTextOutput(
      JSON.stringify({"result": "Success"})
    ).setMimeType(ContentService.MimeType.JSON);
  }
  catch(error) {
    return ContentService.createTextOutput(
      JSON.stringify({"result": "Error", "message": error.toString()})
    ).setMimeType(ContentService.MimeType.JSON);
  }
}
Step 3: Deploy Web App
- Click Deploy → New deployment
- Choose “Web app” as deployment type
- Set Execute as: Me (your Google account)
- Set Who has access: Anyone
- Click Deploy
- Copy the Web App URL
Step 4: Use Deployment URL in ESP32 Code
Example HTTP GET request from ESP32 to Google Sheets:
https://script.google.com/macros/s/YOUR_SCRIPT_ID/exec?uid=A1B2C3D4&time=12:45pm&name=John%20DoeReplace ESP32 code with your URL (remember to URL-encode names if needed). The webhook will automatically append data into the Google Sheet.
Coding the ESP32 for RFID Attendance
Full Arduino Sketch (Copy-Paste Ready)
#include <SPI.h>
#include <MFRC522.h>
#include <WiFi.h>
#include <HTTPClient.h>
#include <Wire.h>
#include <Adafruit_GFX.h>
#include <Adafruit_SSD1306.h>
#include <ArduinoJson.h>

#define RST_PIN 4   // D4
#define SS_PIN 5    // D5

MFRC522 rfid(SS_PIN, RST_PIN);

#define SCREEN_WIDTH 128
#define SCREEN_HEIGHT 64
#define OLED_RESET -1
Adafruit_SSD1306 display(SCREEN_WIDTH, SCREEN_HEIGHT, &Wire, OLED_RESET);

// ===== CONFIGURE THESE =====
const char* ssid = "YOUR_WIFI_NAME";
const char* password = "YOUR_WIFI_PASSWORD";

String firebaseUrl = "YOUR_PROJECT.firebaseio.com";
String firebaseKey = "YOUR_FIREBASE_SECRET";

String sheetsUrl = "YOUR_GOOGLE_APPS_SCRIPT_URL";

// Function prototypes
void connectWiFi();
void showReady();
void showScanning(String uid);
void showSuccess(String uid);
void showError();
void showMessage(String line1, String line2, String line3);
String getUID();
String getTime();
bool sendFirebase(String uid, String time);
bool sendSheets(String uid, String time);

void setup() {
  Serial.begin(115200);
  SPI.begin();
  rfid.PCD_Init();

  if(!display.begin(SSD1306_SWITCHCAPVCC, 0x3C)) {
    Serial.println("OLED failed");
    while(1);
  }

  connectWiFi();
  showReady();
}

void loop() {
  if (WiFi.status() != WL_CONNECTED) connectWiFi();

  if (rfid.PICC_IsNewCardPresent() && rfid.PICC_ReadCardSerial()) {
    String uid = getUID();

    showScanning(uid);

    String time = getTime();

    if (sendFirebase(uid, time) && sendSheets(uid, time)) {
      showSuccess(uid);
    } else {
      showError();
    }

    delay(3000);
    showReady();

    rfid.PICC_HaltA();
  }
  delay(200);
}

String getUID() {
  String uid = "";
  for (byte i = 0; i < rfid.uid.size; i++) {
    uid += rfid.uid.uidByte[i] < 0x10 ? "0" : "";
    uid += String(rfid.uid.uidByte[i], HEX);
  }
  uid.toUpperCase();
  return uid;
}

String getTime() {
  return String(millis());
}

void connectWiFi() {
  WiFi.begin(ssid, password);
  showMessage("Connecting WiFi", "...", "");

  int i = 0;
  while (WiFi.status() != WL_CONNECTED && i < 20) {
    delay(500);
    Serial.print(".");
    i++;
  }
  Serial.println();
  Serial.print("IP: ");
  Serial.println(WiFi.localIP());
}

bool sendFirebase(String uid, String time) {
  if (WiFi.status() == WL_CONNECTED) {
    HTTPClient http;
    String url = "https://" + firebaseUrl + "/attendance.json?auth=" + firebaseKey;

    StaticJsonDocument<200> doc;
    doc["uid"] = uid;
    doc["time"] = time;

    String json;
    serializeJson(doc, json);

    http.begin(url);
    http.addHeader("Content-Type", "application/json");
    int code = http.POST(json);
    http.end();

    Serial.print("Firebase: ");
    Serial.println(code);

    return (code == 200 || code == 201);
  }
  return false;
}

bool sendSheets(String uid, String time) {
  if (WiFi.status() == WL_CONNECTED) {
    HTTPClient http;
    String url = sheetsUrl + "?uid=" + uid + "&time=" + time;
    http.begin(url);
    int code = http.GET();
    http.end();

    Serial.print("Sheets: ");
    Serial.println(code);

    return (code == 200 || code == 302);
  }
  return false;
}

void showReady() {
  showMessage("Attendance Ready", "Scan Card", "");
}

void showScanning(String uid) {
  showMessage("Scanning", uid, "Processing...");
}

void showSuccess(String uid) {
  showMessage("SUCCESS", uid, "Saved!");
}

void showError() {
  showMessage("ERROR", "Check WiFi", "or Cloud");
}

void showMessage(String line1, String line2, String line3) {
  display.clearDisplay();
  display.setTextSize(1);
  display.setTextColor(WHITE);
  display.setCursor(0, 15);
  display.println(line1);
  display.setCursor(0, 35);
  display.println(line2);
  if (line3 != "") {
    display.setCursor(0, 50);
    display.println(line3);
  }
  display.display();
}
BEFORE UPLOADING – UPDATE THESE 3 LINES:
Line 22-23: WiFi credentials
const char* ssid = "YourHomeWiFi";
const char* password = "YourWiFiPassword";Line 25-26: Firebase config
String firebaseUrl = "yourproject.firebaseio.com";
String firebaseKey = "your_api_key_here";Line 28: Google Sheets URL
String sheetsUrl = "https://script.google.com/macros/s/YOUR_SCRIPT_ID/exec";Uploading, Testing & Debugging
Uploading your code to ESP32
- Select Board:
Tools → Board → ESP32 Arduino → ESP32 Dev Module - Select Port:
Tools → Port → COM6(your ESP32 port) - Click Verify → Should show:
291KB (22%) of program storage - Click Upload (→ arrow icon)
- If stuck at “Connecting…” → Hold BOOT button 3 seconds during upload
- Success message:
Hard resetting via RTS pin...
Expected output:
esptool v5.1.0 Serial port COM6
Chip type: ESP32-D0WD-V3
Writing at 0x00010000 [==========================] 100%
Hard resetting via RTS pin... ✅First RFID card scan
After upload, watch OLED sequence:
1. "Connecting WiFi..." + dots (10 seconds)
2. "Attendance Ready"
   "Scan Card"
3. Scan RFID card → "Scanning" + UID
4. "ERROR" (normal - no Firebase yet)Serial Monitor (115200 baud) shows:
IP: 192.168.1.100
Card scanned: A1B2C3D4
Firebase: -1
Sheets: -1Viewing attendance in cloud
Firebase Console:
- Go to
console.firebase.google.com - Select your project → Realtime Database
- Path:
/attendance→ See JSON entries appear
Google Sheets:
- Open your Google Sheet
- New rows auto-appear:
[UID, Time, Date]
Firebase shows:
{
  "-N123abc": {
    "uid": "A1B2C3D4",
    "time": "12345678"
  }
}Debugging common errors
| Error | OLED/Serial Shows | Fix |
|---|---|---|
| Upload fails | Connecting.... (stuck) | Hold BOOT button 3 sec during upload |
| No WiFi | No dots, stays on WiFi screen | Check SSID/password spelling (case-sensitive) |
| No RFID | “Attendance Ready” but no scan | Check wiring: D4(RST), D5(SS), D18,19,23 |
| OLED blank | Nothing displays | Check D21(SDA), D22(SCK), 3.3V power |
| “Firebase: -1” | Normal (no config yet) | Setup Firebase later |
| Random chars | Garbage in Serial Monitor | Wrong baud rate → Set 115200 |
Quick fixes:
❌ No Serial output → Tools → Serial Monitor → 115200 baud
❌ OLED shows garbage → Power cycle ESP32
❌ Multiple card reads → Increase delay(3000) to delay(5000)Test checklist:
- Upload successful
- WiFi connects (IP in Serial Monitor)
- OLED shows “Attendance Ready”
- RFID card detected on scan
- “ERROR” message appears (expected)
Enhancing the System
Making a web dashboard
Firebase Console = Your INSTANT Live Dashboard! (No extra hosting needed)
Step 1: Access Firebase Live Dashboard
1. Go to console.firebase.google.com
2. Select your project
3. Click "Realtime Database" → "Data" tab
4. LIVE attendance appears instantly!Your data shows LIVE:
yourproject.firebaseio.com/attendance/
├── -N123abc: { "uid": "A1B2C3D4", "time": "123456" }
├── -N456def: { "uid": "B2C3D4E5", "time": "123789" }
└── Updates every card scan! 👇Step 2: Shareable Mobile Dashboard
Direct link: https://yourproject.firebaseio.com/attendance.json

✅ Phone browser → Live JSON data
✅ Bookmark for teachers
✅ No app install needed
✅ Works offline (cached)Step 3: Google Sheets Dashboard (Automatic Reports)
Your Sheet auto-updates:
| UID       | Time     | Date        |
|-----------|----------|-------------|
| A1B2C3D4  | 23:14:23 | 27-Nov-2025 |
| B2C3D4E5  | 23:15:01 | 27-Nov-2025 |

Share: sheets.google.com → "Anyone with link"
Complete Dashboard System:
ESP32 → Firebase (Live JSON) + Google Sheets (Excel)
         ↓                           ↓
Firebase Console (Live)     Google Sheets (Reports)
Dashboard URLs ready to share:
🔴 Live: yourproject.firebaseio.com/attendance.json
📊 Reports: docs.google.com/spreadsheets/YOUR_SHEET_IDReal Project Experience & Troubleshooting
Wiring mistakes I actually made
❌ RFID VCC to 5V → Module fried instantly (use 3.3V only)
❌ MISO/MOSI swapped → No card detection
❌ Forgot common GND → Random resets
❌ OLED SDA to D20 → Blank screen (use D21)RFID reader troubles & solutions
❌ "No card detected" → Check D4(RST), D5(SS), 3.3V wiring
❌ "Card read failed" → Add 10kΩ pullup on RST pin
❌ Multiple reads → Increase delay(3000) → delay(5000)
❌ Weak range → Add 100uF capacitor across RFID VCC/GNDPreventing WiFi dropouts
unsigned long lastCheck = 0;
void loop() {
  if(millis() - lastCheck > 30000) {  // Check every 30s
    if(WiFi.status() != WL_CONNECTED) connectWiFi();
    lastCheck = millis();
  }
}Frequently Asked Questions
What is the maximum number of cards supported?
The ESP32 can handle over 65,000 unique RFID card UIDs—ideal for classrooms or offices.
Will it work if the WiFi goes down?
The card scan data appears on the Serial Monitor, so you don’t lose local records. For true offline storage, code could be extended to save to SD card.
Can NFC phones act as RFID cards?
Yes, using NFC stickers or compatible apps, you can register phones as valid RFID tags.
How do I add another ESP32 scanner at a different door?
Use the same Firebase and Google Sheets URLs—multiple devices will sync attendance records.
What wiring problems are most common?
Mistakes like swapping MISO/MOSI, using 5V instead of 3.3V for the RFID module, or leaving out a common ground.