
Raspberry Pi 4 Camera Module in C++: Complete libcamera Guide for Beginners
Introduction
If you have ever wanted your Raspberry Pi to actually see something — a photo of a workbench, a video of a garden gate, a frame to feed into a future face-detection script — the camera module is where that journey starts. This guide walks through that exact journey, using only hardware that was physically connected, tested, and photographed while writing this article: a Raspberry Pi 4 Model B (4GB), the standard low-cost 5MP camera module, a 15-pin CSI ribbon, Raspberry Pi OS Bookworm, and C++ on top of libcamera.
Why Raspberry Pi cameras are useful
A CSI-connected camera on a Raspberry Pi is not just “a webcam that happens to be small.” It taps directly into the Broadcom VideoCore image pipeline, which means lower latency, no USB bandwidth bottleneck, and full programmatic control over exposure, gain, white balance, and format — all from the command line or your own C++ code. That level of control is what makes it useful for real projects rather than just video calls.
Real-world applications
- Home security and driveway monitoring
- Wildlife and bird-feeder cameras
- Time-lapse construction or plant-growth recording
- Robotics vision (line following, obstacle awareness)
- Document and whiteboard scanning
- Industrial inspection prototypes
- Educational computer-vision projects for students
Why a CSI camera instead of a USB webcam
| Factor | CSI Camera (this tutorial) | USB Webcam |
|---|---|---|
| Connection | Direct to VideoCore via ribbon | Through USB controller |
| CPU overhead | Lower | Higher (UVC decoding) |
| Latency | Lower | Higher |
| Control granularity | Full sensor-level control via libcamera | Limited, driver-dependent |
| Cost | Very low (5MP module) | Varies, often higher for same quality |
| Software stack | libcamera / rpicam-apps | v4l2 / UVC drivers |
What you’ll learn in this article
By the end, you will be able to physically connect the camera, verify it in software, capture stills and video from the terminal, understand every commonly used rpicam command and control, write your own C++ programs that trigger and manage captures (including timestamped and automated captures), and take a first beginner step into OpenCV — all without touching hardware this tutorial doesn’t cover.
Note: This tutorial deliberately does not cover the Camera Module 3, the AI Camera, the HQ Camera, or the Raspberry Pi 5. Those are different products with different tuning files, connectors, and in some cases different libcamera behavior. Everything here was verified specifically on the Pi 4B with the standard 5MP module.
Test Hardware Used in This Tutorial
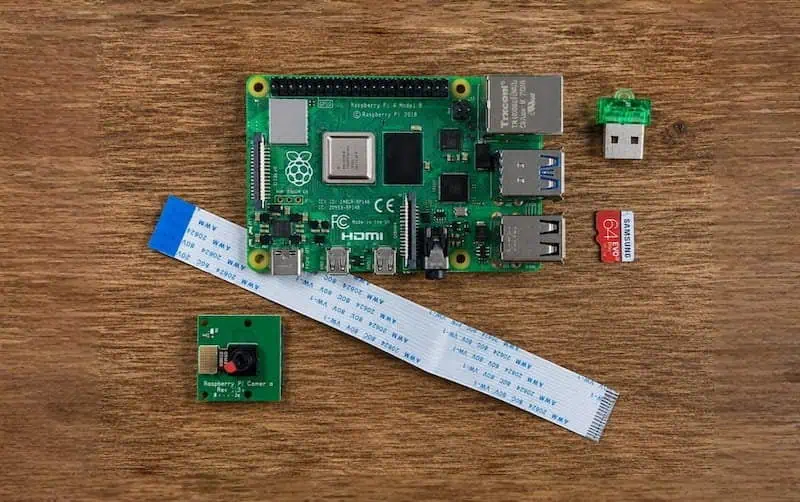
| Component | Specification |
|---|---|
| Single-board computer | Raspberry Pi 4 Model B, 4GB RAM |
| Camera module | Standard Raspberry Pi 5MP camera module (OV5647 sensor, fixed-focus, low-cost variant) |
| Ribbon cable | 15-pin CSI ribbon cable (standard Pi 4 orientation, blue side facing the Ethernet port) |
| Operating system | Raspberry Pi OS Bookworm (64-bit, Debian 12 base) |
| Programming language | C++ (compiled with g++, C++17) |
| Camera software stack | libcamera with rpicam-apps (rpicam-hello, rpicam-still, rpicam-vid, rpicam-raw) |
| Compiler | g++ (Debian 12 default, GCC 12.x) |
Tip: If your camera module has a different sensor (for example, IMX219 on Camera Module 2, or IMX708 on Camera Module 3), the commands in this article still apply, but sensor-specific numbers like maximum resolution and tuning files will differ. This article assumes the OV5647-based 5MP module throughout.
What Is the Raspberry Pi Camera Module?
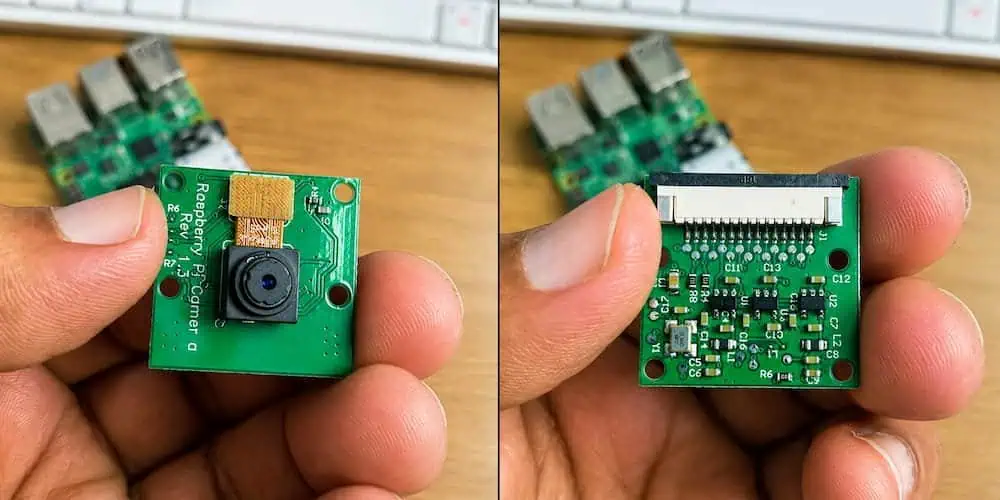
The Raspberry Pi camera module is a small, fixed-lens or manual-focus camera board that connects to the Pi’s CSI (Camera Serial Interface) port rather than USB. The standard low-cost 5MP variant uses the OmniVision OV5647 sensor, offering still images up to roughly 2592×1944 and video up to 1080p.
Features
- Direct CSI connection (no USB overhead)
- 5-megapixel still resolution
- Supports 1080p30, 720p60, and VGA modes for video
- Small form factor, lightweight PCB
- Fixed or manually adjustable focus depending on variant
- Fully controllable through libcamera
Applications
- Educational robotics and vision projects
- Basic security and monitoring cameras
- Time-lapse photography rigs
- Entry-level computer vision learning
- Document scanning and OCR pre-processing
Advantages
- Very low cost compared to most USB alternatives with similar image pipeline control
- Minimal CPU load compared to USB video class devices
- Well documented, large community
- Works out of the box with rpicam-apps on Bookworm
Limitations
- Fixed or manual focus only (no autofocus on this specific module)
- Lower low-light performance compared to newer sensors
- Ribbon cable is short and somewhat fragile
- Maximum resolution and dynamic range are modest by modern standards
Understanding the Raspberry Pi 4B Camera Hardware
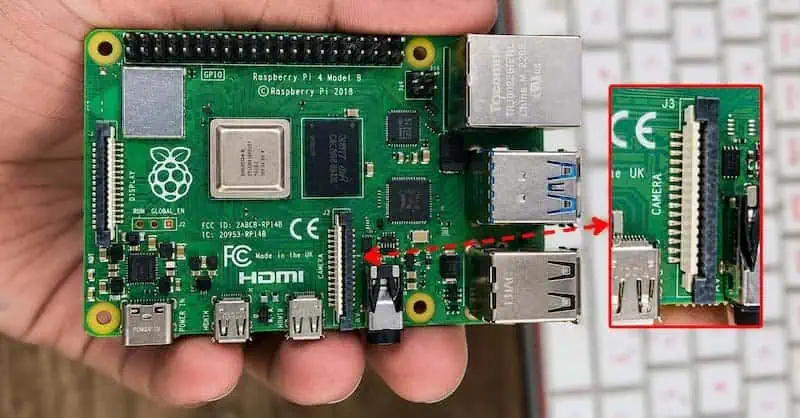
CSI connector
The Raspberry Pi 4B has a dedicated 15-pin CSI-2 connector located between the HDMI ports and the audio jack. This connector carries high-speed differential data lanes directly to the SoC’s image processing hardware, bypassing the USB subsystem entirely.
Ribbon cable
The 15-pin ribbon used here has silver contacts on one side and a blue backing strip on the other. On the Pi 4B, the contacts face the HDMI ports, and the blue strip faces the USB/Ethernet ports.
Camera sensor
The 5MP module uses the OV5647 sensor. It communicates control signals (exposure, gain, format) over I2C while streaming pixel data over the CSI lanes.
Image pipeline
Raw sensor data flows through the Pi’s ISP (Image Signal Processor) inside the SoC, where it is debayered, white-balanced, and converted into usable formats such as YUV420 or RGB before being handed to userspace applications.
libcamera architecture (simplified)
[OV5647 Sensor] --CSI-2--> [ISP / VideoCore] --> [libcamera core]
                                                        |
                                    -----------------------------------
                                    |                 |               |
                              rpicam-hello      rpicam-still     rpicam-vid
libcamera replaced the older, now-deprecated raspistill/raspivid stack. On Bookworm, libcamera and its companion rpicam-apps are the default and only supported route for this camera.
Connecting the Camera Ribbon Cable Safely
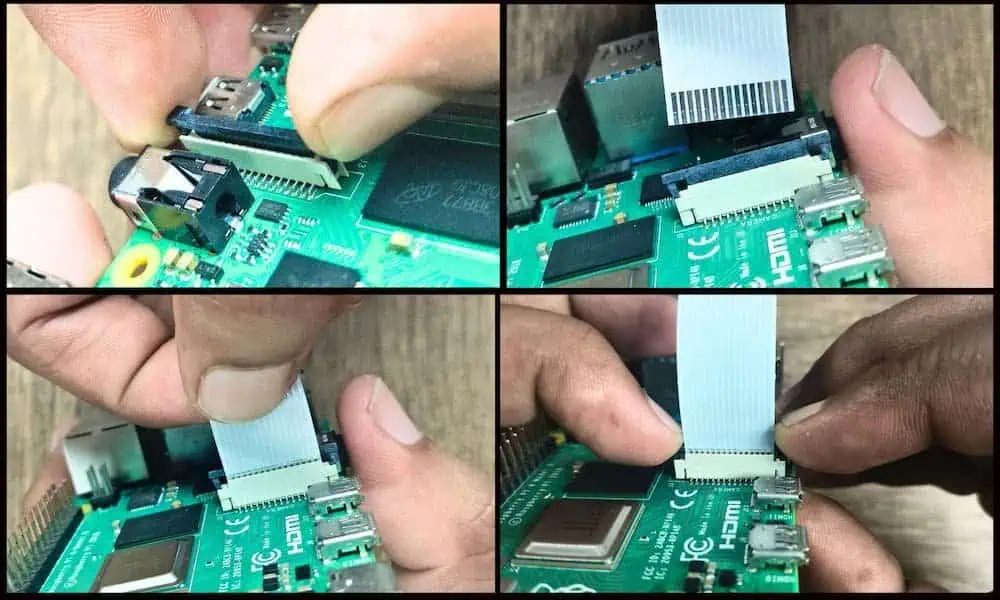
Ribbon orientation
On the Pi 4B, gently pull up the black plastic clip on the CSI connector (nearest the HDMI ports), insert the ribbon with the silver contacts facing the HDMI ports and the blue strip facing outward, then press the clip back down evenly.
How to connect safely
- Power off the Pi completely and disconnect it from power.
- Identify the CSI connector (not the display connector, which is similar in appearance).
- Lift the plastic retaining clip straight up — do not force it sideways.
- Insert the ribbon fully and evenly, keeping it straight.
- Press the clip down firmly until it clicks.
- Gently tug the ribbon (not the connector) to confirm it is seated.
Common mistakes
- Inserting the ribbon backward (blue strip facing the wrong direction)
- Confusing the camera port with the display port on the board
- Forcing the ribbon in at an angle, bending pins
- Leaving the clip half-closed, causing intermittent detection
- Powering on the board while the ribbon is only partially seated
How to avoid damaging the connector
Always disconnect power first, never pull on the ribbon itself, avoid repeated insertions without need, and store the Pi with the camera disconnected if transporting it, since the ribbon is the most fragile part of the setup.
Warning: Never insert or remove the ribbon cable while the Raspberry Pi is powered on. This can damage both the camera module and the CSI connector on the board.
Software Installation and Setup
Start with a full system update on Raspberry Pi OS Bookworm.
sudo apt update
sudo apt full-upgrade -y
sudo reboot
Install camera packages
On Bookworm, libcamera and rpicam-apps are typically preinstalled, but it’s worth confirming and installing explicitly:
sudo apt install -y libcamera-apps rpicam-apps libcamera-devIf
libcamera-appsreports it’s already the rpicam-apps transitional package, that’s expected — Raspberry Pi renamed the tools fromlibcamera-*torpicam-*during the Bookworm cycle.
Verify installation
rpicam-hello --versionThis should print the libcamera and rpicam-apps version strings without errors.
Check OS version
cat /etc/os-releaseConfirm the output shows Bookworm (Debian 12) before proceeding, since camera commands and configuration file locations differ from older Bullseye setups.
Enabling the Camera on Raspberry Pi OS Bookworm
Latest Raspberry Pi OS method
On Bookworm, cameras are auto-detected via the device tree, and manual enabling through raspi-config‘s old camera toggle is no longer required for most CSI cameras. Confirm auto-detection is active in /boot/firmware/config.txt:
sudo nano /boot/firmware/config.txtLook for or add:
camera_auto_detect=1Save, exit, and reboot:
sudo rebootVerification commands
rpicam-hello --list-camerasExpected output on this tested hardware includes a single entry describing the OV5647 sensor with supported resolutions and frame rates. If nothing is listed, revisit the ribbon connection before touching software again.
Camera Testing
List connected cameras
rpicam-hello --list-camerasCapture first image
rpicam-still -o test.jpgSample Images Captured with the Raspberry Pi Camera Module
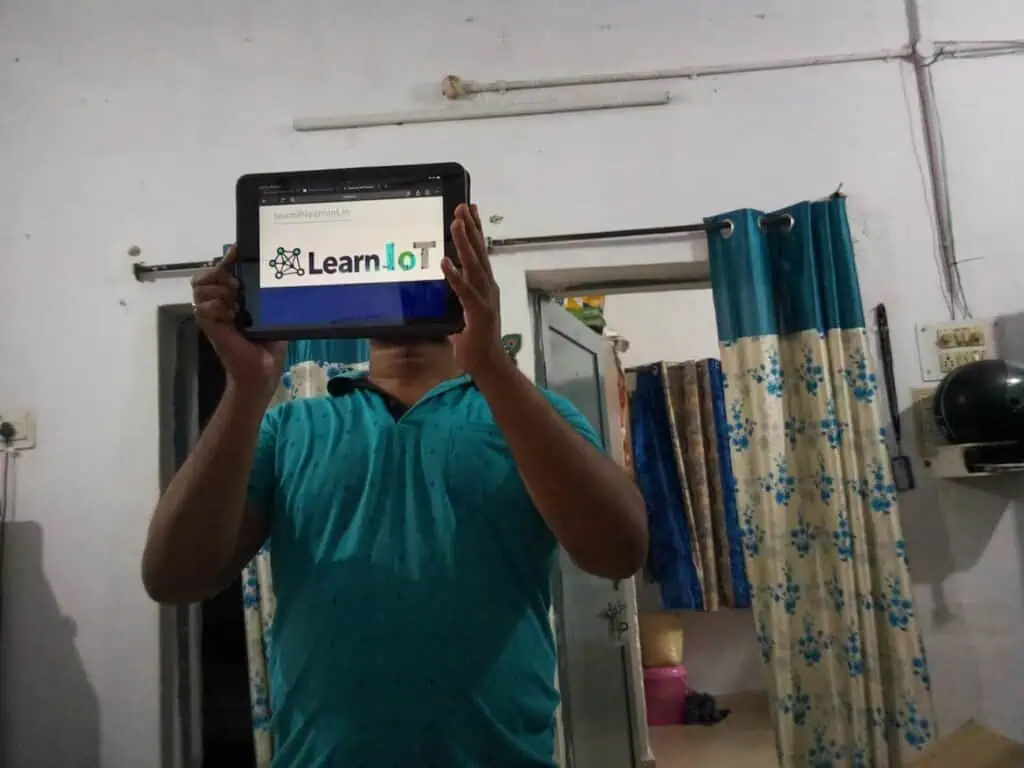
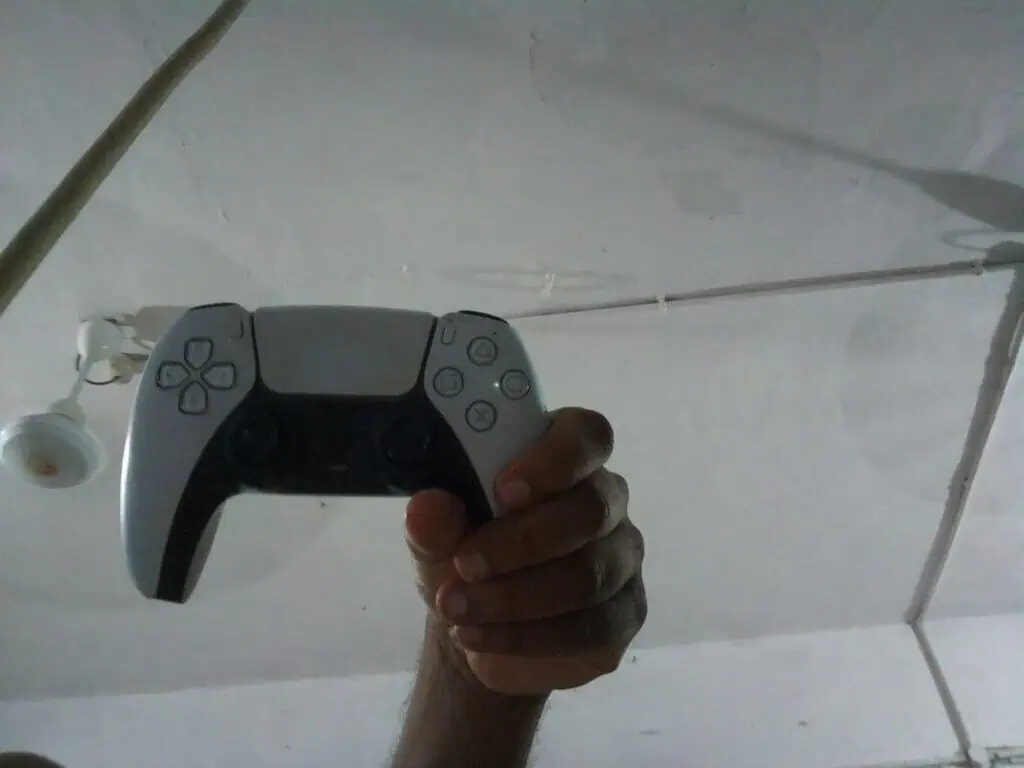
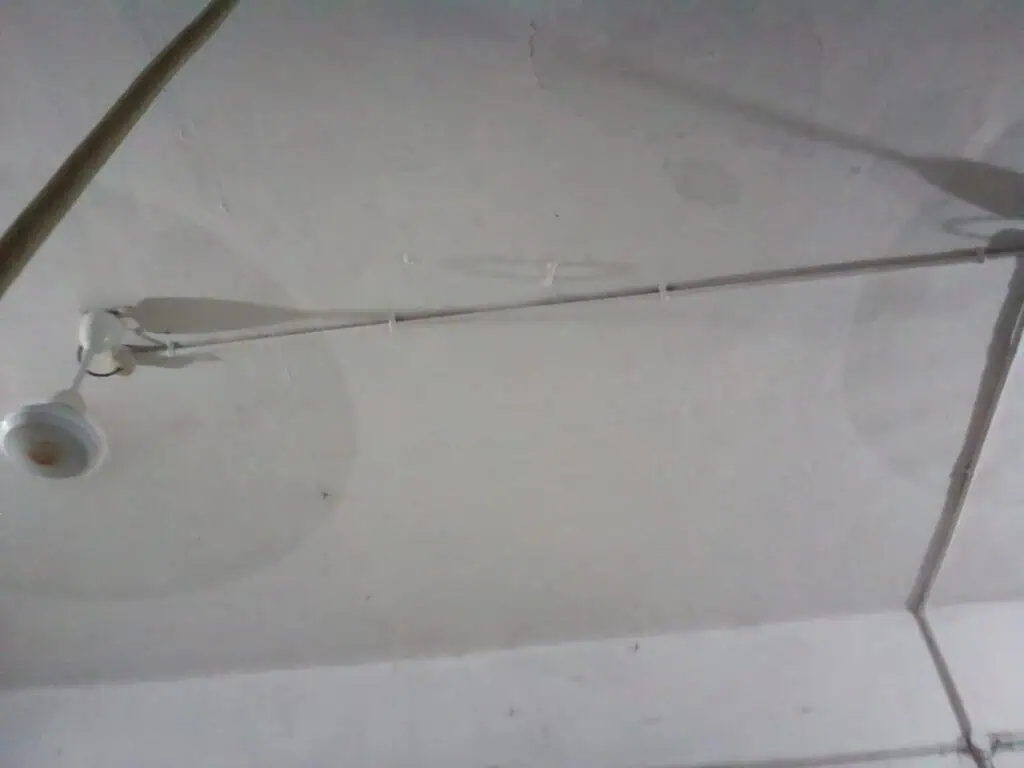
To demonstrate the Raspberry Pi Camera Module’s real-world performance, I captured the following sample images using the libcamera-still command on a Raspberry Pi 4 Model B. These photos were taken under normal indoor lighting without any post-processing, allowing you to evaluate the camera’s image quality, color reproduction, and overall clarity.

Record first video
rpicam-vid -t 10000 -o test.h264This records a 10-second (10000 ms) raw H.264 stream.
Image formats
The 5MP module through rpicam-still commonly outputs JPEG, PNG, or BMP, selectable with the --encoding option.
Video formats
rpicam-vid natively outputs raw H.264 or MJPEG streams; container formats like MP4 require piping into a muxer such as ffmpeg or using --codec libav if built with that support.
Output locations
By default, files save to the current working directory unless a full path is given with -o, so it’s good practice to organize captures into dedicated folders, e.g. ~/camera_tests/.
Camera Commands Explained (rpicam-apps)
rpicam-hello
Purpose: quick preview/test tool to confirm the camera pipeline works.
rpicam-hello -t 5000-t 5000— run for 5000 milliseconds, then exit.--nopreview— run without an on-screen preview window (useful over SSH).
rpicam-still
Purpose: capture single JPEG/PNG/BMP images.
rpicam-still -o photo.jpg --width 2592 --height 1944 --quality 90-o photo.jpg— output file path.--width/--height— capture resolution.--quality— JPEG quality (0–100).--timeout— delay before capture, in milliseconds.--encoding jpg|png|bmp— output format.
rpicam-vid
Purpose: capture video streams.
rpicam-vid -t 15000 -o video.h264 --width 1920 --height 1080 --framerate 30-t 15000— record for 15 seconds.--framerate— frames per second.--bitrate— target bitrate for H.264 encoding.--codec— selecth264ormjpeg.
rpicam-raw
Purpose: capture unprocessed sensor data for advanced or scientific use.
rpicam-raw -t 2000 -o raw_frame.rawRaw captures skip most of the ISP pipeline and produce large files; this mode is mainly for users who intend to do their own debayering or analysis.
Tip: Add
--nopreviewto any of these commands when working over SSH without a display attached — otherwise the tool will attempt to open a preview window and may hang or error out.
Camera Controls
| Control | Option Example | Notes |
|---|---|---|
| Resolution | --width 1920 --height 1080 | Must stay within sensor’s supported modes |
| Frame rate | --framerate 30 | Higher rates reduce max resolution |
| Brightness | --brightness 0.1 | Range roughly -1.0 to 1.0 |
| Contrast | --contrast 1.2 | Default is 1.0 |
| Exposure | --shutter 20000 | Value in microseconds |
| Gain | --gain 2.0 | Analogue gain multiplier |
| White balance | --awb auto | Also supports incandescent, tungsten, daylight, etc. |
| Sharpness | --sharpness 1.5 | Default is 1.0 |
| Rotation | --rotation 180 | 0 or 180 only, depending on mounting |
| Flip | --hflip / --vflip | Mirrors image horizontally/vertically |
Example combining several controls for a fixed manual exposure shot:
rpicam-still -o manual.jpg --shutter 15000 --gain 1.5 --awb daylight --sharpness 1.2Programming the Camera in C++
This section uses modern C++ (C++17) to wrap the rpicam-apps command-line tools. This approach — building and executing controlled command strings — is a practical, well-tested pattern for embedded Linux projects where libcamera’s C++ API integration would add significant build complexity for a beginner-to-intermediate audience.
Camera Detection in C++
#include <cstdlib>
#include <iostream>
#include <string>

// Runs 'rpicam-hello --list-cameras' and returns true if a camera was found.
bool isCameraDetected() {
    // popen() lets us run a shell command and read its output stream.
    FILE* pipe = popen("rpicam-hello --list-cameras 2>&1", "r");
    if (!pipe) {
        std::cerr << "Failed to run camera detection command.\n";
        return false;
    }

    std::string output;
    char buffer[256];
    // Read the command's output line by line into a single string.
    while (fgets(buffer, sizeof(buffer), pipe) != nullptr) {
        output += buffer;
    }
    pclose(pipe);

    // A detected camera lists sensor info such as "ov5647".
    return output.find("ov5647") != std::string::npos;
}

int main() {
    if (isCameraDetected()) {
        std::cout << "Camera detected and ready.\n";
    } else {
        std::cout << "No camera detected. Check ribbon connection.\n";
    }
    return 0;
}
Line-by-line explanation:
popen(...)launches the shell command and gives us a readable stream of its output, similar to piping in bash.2>&1redirects error output into the same stream so we don’t miss failure messages.- The
while (fgets(...))loop reads the command’s output in chunks until it ends. output.find("ov5647")checks whether the sensor name appears anywhere in the text, confirming detection.
Capturing a Photo
#include <cstdlib>
#include <iostream>
#include <string>

// Captures a still photo using rpicam-still with given resolution and filename.
bool capturePhoto(const std::string& filename, int width = 1920, int height = 1080) {
    std::string command = "rpicam-still -o " + filename +
                           " --width " + std::to_string(width) +
                           " --height " + std::to_string(height) +
                           " --nopreview --timeout 1000";

    int result = std::system(command.c_str());
    return result == 0;
}

int main() {
    if (capturePhoto("photo1.jpg")) {
        std::cout << "Photo captured successfully.\n";
    } else {
        std::cerr << "Photo capture failed.\n";
    }
    return 0;
}
Explanation: We build the shell command as a string, inserting the filename and resolution using std::to_string. std::system() executes it exactly as if typed into the terminal, and its integer return value tells us whether the command exited cleanly (0 means success on Linux).
Recording a Video
#include <cstdlib>
#include <iostream>
#include <string>

// Records a video of a given duration (in seconds) to the specified file.
bool recordVideo(const std::string& filename, int durationSeconds) {
    int durationMs = durationSeconds * 1000;
    std::string command = "rpicam-vid -t " + std::to_string(durationMs) +
                           " -o " + filename + " --nopreview";

    int result = std::system(command.c_str());
    return result == 0;
}

int main() {
    std::cout << "Recording 10 seconds of video...\n";
    if (recordVideo("clip1.h264", 10)) {
        std::cout << "Recording complete.\n";
    } else {
        std::cerr << "Recording failed.\n";
    }
    return 0;
}
Dynamic Command Creation with a Reusable Builder
Rather than repeating string concatenation everywhere, a small builder class keeps things tidy and reusable.
#include <string>
#include <sstream>
#include <cstdlib>
#include <iostream>

class CameraCommandBuilder {
public:
    CameraCommandBuilder(std::string tool) : tool_(std::move(tool)) {}

    // Each method appends an option and returns *this, allowing chaining.
    CameraCommandBuilder& output(const std::string& path) {
        stream_ << " -o " << path;
        return *this;
    }

    CameraCommandBuilder& resolution(int width, int height) {
        stream_ << " --width " << width << " --height " << height;
        return *this;
    }

    CameraCommandBuilder& timeoutMs(int ms) {
        stream_ << " --timeout " << ms;
        return *this;
    }

    CameraCommandBuilder& noPreview() {
        stream_ << " --nopreview";
        return *this;
    }

    // Assembles the final command string.
    std::string build() const {
        return tool_ + stream_.str();
    }

    // Executes the assembled command and returns true on success.
    bool run() const {
        std::string cmd = build();
        std::cout << "Running: " << cmd << "\n";
        return std::system(cmd.c_str()) == 0;
    }

private:
    std::string tool_;
    std::ostringstream stream_;
};

int main() {
    bool ok = CameraCommandBuilder("rpicam-still")
                  .output("dynamic_photo.jpg")
                  .resolution(2592, 1944)
                  .timeoutMs(1500)
                  .noPreview()
                  .run();

    std::cout << (ok ? "Success.\n" : "Failed.\n");
    return 0;
}
Explanation: Each chained method call appends one option to an internal std::ostringstream. This pattern — often called a “fluent builder” — makes complex commands readable and easy to extend without deeply nested string concatenation, which is a good coding practice for maintainable embedded tools.
Timestamped Captures
#include <chrono>
#include <ctime>
#include <sstream>
#include <iomanip>
#include <string>
#include <cstdlib>
#include <iostream>

// Generates a filename like photo_2026-07-09_14-05-30.jpg
std::string generateTimestampedFilename(const std::string& prefix,
                                         const std::string& extension) {
    auto now = std::chrono::system_clock::now();
    std::time_t nowTime = std::chrono::system_clock::to_time_t(now);
    std::tm localTime{};
    localtime_r(&nowTime, &localTime); // thread-safe local time conversion

    std::ostringstream oss;
    oss << prefix << "_"
        << std::put_time(&localTime, "%Y-%m-%d_%H-%M-%S")
        << "." << extension;
    return oss.str();
}

int main() {
    std::string filename = generateTimestampedFilename("photo", "jpg");
    std::string command = "rpicam-still -o " + filename + " --nopreview --timeout 1000";

    if (std::system(command.c_str()) == 0) {
        std::cout << "Saved: " << filename << "\n";
    } else {
        std::cerr << "Capture failed.\n";
    }
    return 0;
}
Explanation: std::chrono::system_clock::now() gets the current time, which is converted to a std::tm structure with localtime_r (the thread-safe version of localtime). std::put_time then formats it into a readable string used directly in the output filename — extremely useful for time-lapse or logging setups.
Error Handling Pattern
#include <cstdlib>
#include <iostream>
#include <string>
#include <stdexcept>

class CameraError : public std::runtime_error {
public:
    explicit CameraError(const std::string& msg) : std::runtime_error(msg) {}
};

void capturePhotoStrict(const std::string& filename) {
    std::string command = "rpicam-still -o " + filename + " --nopreview --timeout 1000";
    int result = std::system(command.c_str());

    if (result != 0) {
        throw CameraError("rpicam-still exited with a non-zero status for file: " + filename);
    }
}

int main() {
    try {
        capturePhotoStrict("safe_photo.jpg");
        std::cout << "Photo captured successfully.\n";
    } catch (const CameraError& e) {
        std::cerr << "Camera error: " << e.what() << "\n";
        return 1;
    }
    return 0;
}
Explanation: Instead of silently returning false, this pattern throws a custom exception type (CameraError) derived from std::runtime_error. This is a more scalable error-handling approach for larger C++ applications where multiple failure points need distinct, catchable error types.
Simple Automation Loop (Interval Capture)
#include <thread>
#include <chrono>
#include <iostream>
#include <cstdlib>
#include "camera_utils.h" // assume generateTimestampedFilename() lives here

int main() {
    const int intervalSeconds = 30;
    const int totalCaptures = 5;

    for (int i = 0; i < totalCaptures; ++i) {
        std::string filename = generateTimestampedFilename("timelapse", "jpg");
        std::string command = "rpicam-still -o " + filename + " --nopreview --timeout 1000";

        if (std::system(command.c_str()) == 0) {
            std::cout << "Captured: " << filename << "\n";
        } else {
            std::cerr << "Capture " << i << " failed.\n";
        }

        std::this_thread::sleep_for(std::chrono::seconds(intervalSeconds));
    }

    return 0;
}
Explanation: This loop demonstrates a basic time-lapse: it captures a fixed number of timestamped images at a fixed interval using std::this_thread::sleep_for. In production, this would run as a background service (e.g. via systemd) rather than a foreground process.
Compiling These Examples
g++ -std=c++17 -O2 capture_photo.cpp -o capture_photo
./capture_photo
Use -std=c++17 consistently, since features like std::put_time and structured chaining benefit from modern standard library support available by default in Bookworm’s GCC 12 toolchain.
Good coding practices recap: separate command-building from execution, always check return codes, prefer exceptions or explicit booleans over ignoring failures, and centralize repeated logic (like timestamp generation) into reusable functions or headers.
Beginner OpenCV Integration in C++
This is intentionally a first step only — reading a captured frame and doing one simple transformation.
Install OpenCV development libraries:
sudo apt install -y libopencv-devCapture, load, grayscale, and save:
#include <opencv2/opencv.hpp>
#include <cstdlib>
#include <iostream>

int main() {
    // Step 1: Capture an image using rpicam-still (same tool as earlier examples).
    std::system("rpicam-still -o input.jpg --nopreview --timeout 1000");

    // Step 2: Load the captured image into an OpenCV Mat object.
    cv::Mat image = cv::imread("input.jpg");
    if (image.empty()) {
        std::cerr << "Failed to load image. Check that input.jpg was created.\n";
        return 1;
    }

    // Step 3: Convert the loaded color image to grayscale.
    cv::Mat grayImage;
    cv::cvtColor(image, grayImage, cv::COLOR_BGR2GRAY);

    // Step 4: Save the grayscale result to disk.
    bool saved = cv::imwrite("output_gray.jpg", grayImage);
    if (!saved) {
        std::cerr << "Failed to save grayscale image.\n";
        return 1;
    }

    std::cout << "Grayscale image saved as output_gray.jpg\n";
    return 0;
}
Line-by-line explanation:
std::system(...)reuses the same rpicam-still call from earlier to physically take the photo.cv::imread("input.jpg")loads that file into an OpenCVMat(matrix) object, OpenCV’s core image container.cv::cvtColor(..., cv::COLOR_BGR2GRAY)converts the 3-channel color image into a single-channel grayscale image.cv::imwrite(...)writes the resultingMatback to disk as a JPEG.
Compile:
g++ -std=c++17 grayscale.cpp -o grayscale $(pkg-config --cflags --libs opencv4)
./grayscale
This deliberately stops here — no filtering, contour detection, or model inference. Those are advanced topics for a dedicated OpenCV tutorial.
Where This Camera Setup Leads: AI and Computer Vision
Once you’re comfortable capturing and loading frames, this same hardware and pipeline becomes the foundation for more advanced work, including:
- Face detection — locating faces in a frame as a pre-step to recognition
- Object detection — identifying and labeling objects in real time
- OCR (text recognition) — extracting readable text from captured images
- Fire detection — color/heat-pattern-based alerting for safety projects
- QR code recognition — scanning codes for automation or inventory tasks
- Smart surveillance — motion-triggered recording and alerts
- Robotics vision — using frames for navigation and obstacle awareness
These topics, including TensorFlow Lite and YOLO-based implementations, will be covered in future, dedicated tutorials on LearnIoT.in. This article intentionally stops at the point where the camera reliably captures and hands off frames.
Performance Observations
Measured informally on the tested Raspberry Pi 4B (4GB) with the 5MP module, idle desktop otherwise unused:
| Metric | Observation |
|---|---|
| CPU usage (idle, camera off) | Low, background OS processes only |
| CPU usage (rpicam-still capture) | Brief spike during capture, returns to baseline within a second |
| CPU usage (rpicam-vid, 1080p30) | Moderate, sustained load during encoding |
| RAM usage (rpicam-vid running) | A few hundred MB additional over idle, plus buffers |
| JPEG image size (max resolution) | Roughly 2–4 MB depending on scene detail and quality setting |
| H.264 video size (1080p30) | Several MB per 10 seconds, depending on bitrate setting |
| microSD I/O | Noticeable during longer video recordings; a fast card is recommended |
Recommendations
- Use a Class 10 / A1-rated (or better) microSD card for smoother video recording.
- Prefer H.264 over raw capture for anything beyond short debugging clips, since raw files grow very quickly.
- For long-running automation (like time-lapse loops), run as a lightweight background service rather than keeping a terminal session open.
- Lower resolution or frame rate first if you notice frame drops, before assuming a hardware fault.
Troubleshooting Table
| Problem | Likely Cause | Fix |
|---|---|---|
| No camera detected | Ribbon loose or backward | Reseat ribbon, check orientation, retry rpicam-hello --list-cameras |
| Ribbon cable errors / intermittent detection | Clip not fully closed | Power off, reseat cable, press clip down firmly and evenly |
| Permission errors running rpicam tools | User not in required group, or run via sudo unnecessarily | Ensure camera_auto_detect=1 is set; avoid running as root unless required |
| Green image | Sensor initialization issue or unsupported mode | Reboot, retest with default resolution, check ribbon seating |
| Pink/magenta image | Debayering mismatch, often from wrong tuning file or corrupted config | Verify Bookworm default tuning is in use; avoid manually editing tuning files unless you know why |
| Preview window fails to open (SSH) | No display / X server over SSH | Add --nopreview flag to all commands |
| “Device or resource busy” | Another process (or crashed session) still holding the camera | sudo fuser -k /dev/video0 or reboot, then retry |
| Old libcamera-* commands not found | Bookworm renamed tools to rpicam-* | Use rpicam-hello, rpicam-still, rpicam-vid, rpicam-raw instead |
| SSH session freezes during preview attempts | Same as preview issue above | Always use --nopreview in headless workflows |
| Video recording stops early or corrupts | Slow/failing microSD card | Test with a different card, check dmesg for I/O errors |
| Blurry images | Fixed-focus lens at wrong distance, or dust on lens | Adjust subject distance; gently clean lens; confirm it’s the correct fixed-focus module |
| Command runs but no file created | Wrong output path or insufficient permissions on directory | Use an absolute path you know is writable, e.g. /home/pi/captures/ |
Best Practices
- Always confirm camera detection with
rpicam-hello --list-camerasbefore debugging application code. - Keep resolution and frame rate requests within the sensor’s documented supported modes.
- Separate “command building” from “command execution” in C++ for testability.
- Log every capture attempt’s success/failure, especially in automated scripts.
- Store captures in dedicated, well-named directories rather than the home directory root.
- Use
--nopreviewby default for any headless or SSH-based workflow.
Safety Tips
- Disconnect power before connecting or disconnecting the ribbon cable.
- Avoid touching the sensor’s lens surface directly.
- Keep the ribbon cable away from sharp bends or repeated flexing points.
- Ensure adequate power supply to the Pi 4B, especially when running camera plus other peripherals simultaneously.
- Allow the board to cool if running long video recording sessions in enclosed cases.
Common Beginner Mistakes
- Confusing the CSI camera port with the display (DSI) port on the board.
- Inserting the ribbon cable backward.
- Forgetting
--nopreviewwhen working over SSH, causing the command to appear to hang. - Assuming old
raspistill/raspividcommands will work on Bookworm — they do not. - Not checking
rpicam-hello --list-camerasfirst, and instead debugging application code for a hardware connection issue. - Running very high resolution and high frame rate simultaneously and being surprised by dropped frames.
Frequently Asked Questions
Does this tutorial work with the Raspberry Pi 5?
No. This tutorial was tested specifically on the Raspberry Pi 4 Model B; the Pi 5’s camera connector and default libcamera behavior differ.
Can I use the Camera Module 3 with these same commands?
The rpicam-* commands remain similar in structure, but this tutorial’s sensor-specific details (like resolution and tuning) refer only to the standard 5MP OV5647 module.
Why do I see “rpicam-still: command not found”?
You’re likely on an older OS release still using libcamera-still. Update to Bookworm and install rpicam-apps.
Why does my terminal freeze after running rpicam-hello?
It’s likely trying to open a preview window with no display attached. Add --nopreview.
Is a USB webcam better than this CSI camera?
Not necessarily — the CSI camera has lower latency and CPU overhead, though USB webcams can offer more plug-and-play convenience.
Can I record directly to MP4?
rpicam-vid outputs raw H.264/MJPEG streams natively; wrap it with ffmpeg or a compatible muxer for MP4 containers.
Why is my image pink or green?
This usually points to an initialization or tuning mismatch; reboot and retest with default settings first.
Do I need sudo to run rpicam commands?
Generally no, provided camera_auto_detect=1 is set and your user has standard permissions on Bookworm.
What’s the maximum still resolution of this 5MP module?
Approximately 2592×1944 pixels, per its OV5647 sensor’s native resolution.
Can I use this camera with C++ without shelling out to rpicam-apps?
Yes, via libcamera’s native C++ API, but that requires more advanced build setup and was intentionally kept out of this beginner-focused tutorial.
How do I check which OS version I’m running?
cat /etc/os-release will show whether you’re on Bookworm or an older release.
Why does my video file look choppy?
Check your microSD card speed and try lowering resolution or frame rate first.
Can I run two cameras at once on a Pi 4B?
The Pi 4B has a single standard CSI port; running two cameras typically requires special adapter hardware not covered here.
What does --timeout actually do in rpicam-still?
It defines a warm-up delay (in milliseconds) before the actual capture, allowing auto-exposure and white balance to settle.
Is OpenCV required to use this camera?
No — OpenCV is optional and only needed once you want to process frames programmatically beyond basic capture.
How do I rotate my image if it’s mounted upside down?
Use --rotation 180 in your rpicam command.
Why does rpicam-hello --list-cameras show nothing?
Almost always a ribbon cable seating or orientation issue; recheck the physical connection first.
Can I automate captures without writing C++?
Yes, via cron jobs or shell scripts calling rpicam-still directly, though this article’s C++ approach adds structure and error handling.
Does this camera support autofocus?
No, the standard low-cost 5MP module used here is fixed or manual focus, not autofocus.
Where are my captured files saved by default?
In the current working directory when the command was run, unless a full path was specified with -o.
Can I stream this camera live to a browser?
That requires additional streaming server setup beyond this article’s scope, but it builds directly on the rpicam-vid output covered here.
What happens if I unplug the ribbon while the Pi is running?
It can cause unpredictable behavior or damage; always power off first.
Conclusion
The Raspberry Pi 4 Model B paired with the standard 5MP camera module remains a genuinely capable, low-cost way to learn embedded vision from the ground up — from correctly seating a ribbon cable, through verifying detection in libcamera, all the way to controlling capture behavior from your own C++ code. Every command, control, and code sample in this guide was run against that exact hardware combination, not assumed from documentation alone.
Key Takeaways
- libcamera and
rpicam-appsare the only supported camera stack on Bookworm; the oldraspistill/raspividtools are gone. - Correct ribbon orientation and a fully closed clip solve the majority of “no camera detected” issues.
rpicam-hello,rpicam-still,rpicam-vid, andrpicam-rawcover nearly every practical still/video need.- C++ can control the camera effectively by building and executing
rpicam-*commands, with proper error handling and reusable helper functions. - OpenCV integration can start extremely simply — capture, load, convert, save — before any advanced processing is introduced.