
I Turned a $15 Board Into a WiFi Security Camera — Here’s Everything That Went Wrong (And How I Fixed It)
I’ll be honest about how this project started: I bought the XIAO ESP32S3 Sense mostly out of curiosity. A camera, a microphone, an SD card slot, and full WiFi on something the size of a coin seemed like it had to be too good to be true. What I didn’t expect was how much I’d learn from everything that didn’t work on the first try — and by the end, I had a fully functional WiFi camera dashboard with photo capture, video recording, motion detection, and a live video feed, all built from scratch and debugged in real time.
This post is the whole story, warts and all. If you’re picking up this same board, odds are you’ll hit at least two or three of the exact same walls I did — so instead of writing the polished “here’s how you do it” version, I’m walking through what actually happened, in order, including the dead ends.
What This Board Actually Is
The XIAO ESP32S3 Sense is Seeed Studio’s compact ESP32-S3 board with a camera and PDM microphone built onto an expansion plate that clips directly onto the base board.
Turning the board over in my hand, it was hard to believe everything packed onto something this small. Specs that matter for this project:
- ESP32-S3 Sense, dual-core, 240MHz
- 8MB of PSRAM (this becomes a recurring character in this story)
- OV2640 camera sensor, up to 1600×1200
- Built-in microSD card slot
- WiFi + Bluetooth Low Energy
- USB-C for power and programming
For something this small, that’s a genuinely unusual amount of hardware crammed together. Most projects like this normally need a camera module, a separate SD breakout, and careful wiring between the two. Here, it’s all already connected.
Step One: Just Prove the Camera Works
Before building anything ambitious, the first job was the boring but essential one — confirm the camera actually captures something. A minimal sketch: initialize the camera, grab a frame, print its size over Serial.
It worked immediately — maybe too immediately. No stalling, no retry messages, just clean success lines scrolling past on the first try, which is rarely how these things go. That’s what made it feel almost suspicious given what came next:
Camera init OK.
Capture OK: 800x600, 15621 bytes (JPEG)
Capture OK: 800x600, 17856 bytes (JPEG)
Except — 800×600? The OV2640 supports up to 1600×1200, and my config had requested FRAMESIZE_UXGA. The Serial Monitor had the answer sitting right above the capture lines:
WARNING: PSRAM not found.Challenge #1: “PSRAM Not Found” (Even Though I Enabled It)
This one cost more time than it should have. In Arduino IDE’s Tools menu, PSRAM was already set to “OPI PSRAM.” By all accounts, it should have worked. It didn’t.
The camera library on this board leans on PSRAM to hold full-resolution frame buffers — without it, the driver quietly falls back to a smaller resolution and, under load, throws cam_hal: FB-OVF warnings (frame buffer overflow) because there isn’t enough regular SRAM to keep up.
The fix, when a Tools > menu setting doesn’t seem to be taking effect, is almost always a stale build. Going to Tools > Erase All Flash Before Sketch Upload > Enabled, uploading once, and then switching it back to Disabled cleared whatever cached configuration was overriding the PSRAM setting. After that, resolution jumped to a proper 1600×1200 and the overflow warnings disappeared.
Lesson: if a board setting doesn’t seem to apply, don’t assume it’s broken hardware — erase flash once and re-upload before you go any further down a rabbit hole.
Challenge #2: The SD Card That Wouldn’t Mount
This was the big one. Camera confirmed working, onto the SD card — and it flatly refused to mount.
Camera init OK.
FAILED: SD card mount failed. Check card is inserted and FAT32 formatted.
I want to walk through this one step by step because I made almost every mistake possible before landing on the actual fix, and I suspect a lot of people hit the exact same sequence.
First suspicion: bad formatting. The card had been formatted through Windows’ built-in tool. Windows’ formatter is known to produce FAT32 variants that don’t always play nicely with embedded SD libraries. Reformatting with the official SD Card Formatter tool using default settings is the standard fix here — worth doing before anything else.
Second suspicion: the card itself. An 8GB SanDisk card, tested independently in a laptop’s card reader, read and wrote files without issue. So the card was healthy. That ruled out a dead card, which meant the problem lived somewhere in the board or the code.
Third suspicion: insertion. The onboard slot on the Sense expansion board is small and spring-loaded, and it’s surprisingly easy to think a card is fully seated when it’s actually resting a few millimeters out. Reseating it fully, contacts facing the board, is worth double-checking before assuming it’s a software problem.
The actual fix: even with a good card, properly formatted and properly seated, the mount still failed. What finally solved it was being explicit about the SD interface pins and adding internal pull-up resistors before mounting:
pinMode(7, INPUT_PULLUP);
pinMode(9, INPUT_PULLUP);
pinMode(8, INPUT_PULLUP);
SD_MMC.setPins(7, 9, 8);

if (!SD_MMC.begin("/sdcard", true, false, 10000)) {
  Serial.println("FAILED: SD card mount failed.");
}
The XIAO Sense’s onboard SD slot ties CLK, CMD, and D0 to GPIO7, GPIO9, and GPIO8 respectively. On some boards, these lines don’t get reliable pull-up bias by default, which the SD_MMC protocol depends on for stable communication. Explicitly setting INPUT_PULLUP on all three, remapping them with setPins(), and dropping the clock speed from the default down to 10MHz solved it completely:
Camera init OK.
SD card mount OK.
SD card size: 7583MB
Capturing photo...
SUCCESS: saved /photo_0.jpg (66226 bytes)
Lesson: if your SD card is verified good, properly formatted, and fully seated, and it still won’t mount on this specific board — it’s very likely a pull-up bias issue on the fixed SD_MMC pins, not a card or formatting problem at all.
Building the Actual Dashboard
With camera and SD both confirmed, the real project could start: a WiFi web dashboard to control everything from a browser, no computer required after the initial upload.
The core feature set:
- Take Photo — captures a JPEG and saves it straight to the SD card
- Start/Stop Recording — records actual video, saved as a playable file
- Motion detection — auto-captures a photo when something changes in frame
- Live View — a real-time video feed in the browser
- File management — download or delete anything on the card, without ever removing it physically
- Emergency Stop / Restart — for when something needs to be halted or the board needs a clean reboot
The Video Recording Problem
Here’s something that trips people up: the ESP32-S3 has no hardware video encoder. There’s no built-in way to produce an MP4. What every ESP32-CAM-style “video recording” project actually does under the hood is capture a continuous stream of individual JPEG frames and wrap them in a standard MJPEG-in-AVI container — a real, playable .avi file, just built frame by frame in software instead of properly compressed like an MP4 would be.
Building that container on the ESP32-S3 means hand-writing the AVI file structure — a RIFF header (the file’s main label, telling programs “this is an AVI video”), stream headers (details like frame size and speed), a movi section holding each JPEG frame as a 00dc chunk (basically a small tag saying ‘a new photo starts here’) — and then going back at the end to patch in the total frame count and final file size, since neither is known until recording actually stops. The function below (writeLE32) is just how the code writes those numbers into the file in the format AVI expects — think of it as filling in blanks on a form once the final values are known:
void stopRecording() {
  if (!recording) return;
  recording = false;
  uint32_t fileEnd = aviFile.position();

  uint32_t moviSize = fileEnd - (g_moviSizeOffset + 4);
  aviFile.seek(g_moviSizeOffset);
  writeLE32(aviFile, moviSize);

  aviFile.seek(g_avihFramesOffset);
  writeLE32(aviFile, frameCount);

  aviFile.seek(g_strhLengthOffset);
  writeLE32(aviFile, frameCount);

  aviFile.seek(4);
  writeLE32(aviFile, fileEnd - 8);

  aviFile.close();
}
The result opens fine in VLC and most standard media players. It’s not a compression marvel, but it’s a genuinely working, standalone video file recorded entirely on a microcontroller the size of a stamp.
Motion Detection Without Any AI Library
There was a real temptation to slap “AI-powered” on this feature, and I want to be upfront about why I didn’t. True on-device machine learning (face detection, object classification) is possible on the ESP32-S3, but it means pulling in extra frameworks with real compatibility risk across different core versions — not something worth gambling on for a feature that has a much simpler, equally effective solution here.
What’s actually running is a lightweight difference check: each new JPEG frame gets sampled and compared against the previous one, both in overall file size and in a sampled byte-by-byte difference. Cross a threshold on either measure, and it saves a snapshot:
uint32_t avgDiff = samples ? (uint32_t)(diffSum / samples) : 0;
long sizeDiff = abs((long)fb->len - (long)prevFrameLen);

if (avgDiff > MOTION_BYTE_THRESHOLD || sizeDiff > MOTION_SIZE_THRESHOLD) {
  motion = true;
}
It’s not computer vision. It’s closer to a smoke detector than a security guard. But it’s honest about what it is, it’s completely reliable, and it catches real movement in a room without needing anything beyond the camera that was already there.
Challenge #3: The Live Stream That Froze Everything
Once photo, video, and motion detection were all working, adding a live browser view seemed like the obvious next step — and it worked beautifully, right up until it didn’t.
The stream works by holding one connection open and continuously pushing new JPEG frames to the browser in a loop:
while (client.connected()) {
  camera_fb_t *fb = esp_camera_fb_get();
  ...
  client.write(fb->buf, fb->len);
  ...
}
The problem: that loop only exits when client.connected() turns false — and that depends entirely on the browser cleanly signaling a disconnect. Switch tabs, let the connection idle, or hit any kind of network hiccup, and that signal doesn’t always arrive. The board just sits there, waiting on a connection that, from its perspective, never actually ended — and since it’s a single-threaded server, nothing else gets served while it waits.
The fix was two-fold: a hard time limit that guarantees the board always takes back control after two minutes, no matter what the browser does, plus forcing the connection closed from the ESP32’s side instead of relying solely on the browser:
unsigned long streamStart = millis();
const unsigned long MAX_STREAM_MS = 120000;

while (client.connected() && (millis() - streamStart < MAX_STREAM_MS)) {
  // ...stream frames...
}
client.stop(); // don't rely on the browser to say goodbye properly
Lesson: any loop that depends on detecting a client disconnect needs its own hard timeout as a safety net. Never trust the other end of a network connection to tell you when it’s done.
Challenge #4: A Dashboard That Looked Permanently Stuck
Separately, the dashboard itself developed a habit of looking frozen — endlessly loading, unresponsive to clicks. This one turned out to be two smaller issues stacking on top of each other.
First, the page had a <meta http-equiv="refresh" content="5"> tag, auto-reloading it every five seconds. Second, the photo section displayed every saved image as an inline thumbnail — meaning every single photo on the card triggered its own separate image request. On a single-threaded web server, those requests queue up one at a time. With more than a couple of test photos sitting on the card, the page simply couldn’t finish loading all of them within five seconds, so the auto-refresh kicked in and restarted the whole process before the last one even finished — a loop with no natural end.
The fix: drop the auto-refresh in favor of a manual Refresh button, and replace the always-loading thumbnail grid with a plain file list — images only load when you actually click to view one.
Lesson: auto-refresh and eagerly-loaded media are a bad combination on anything with limited concurrent request handling. If a page needs live-feeling data, refresh selectively, not the whole page.
Challenge #5: Garbled Icons
The smallest bug, and the one that made me laugh the most. After adding some visual polish with emoji icons on the dashboard buttons, they rendered as broken text:
ð Ÿ"· XIAO ESP32S3 SenseClassic character-encoding mismatch. The page was sending proper UTF-8 bytes, but nothing told the browser that’s what it was looking at, so it defaulted to interpreting them as a different character set entirely. Adding <meta charset="UTF-8"> to the page head, plus explicitly setting text/html; charset=utf-8 on the HTTP response itself, fixed it instantly.
Lesson: any time you’re serving non-ASCII characters (emoji, accented letters, non-English text) from an embedded web server, declare your character encoding explicitly. Don’t assume the browser will guess correctly.
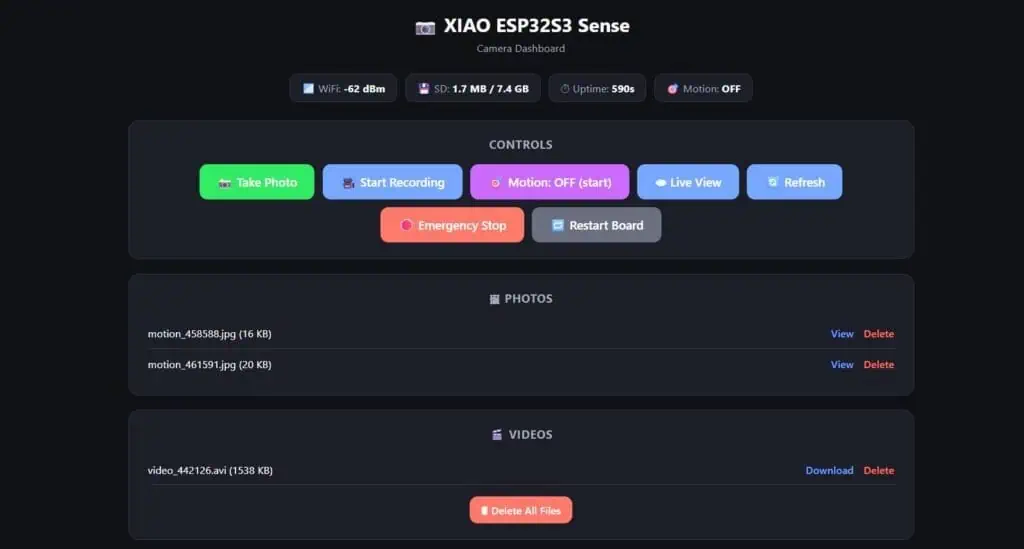
The Finished Dashboard
What actually ended up on the board:
- A dark-themed, centered dashboard with a live status bar (WiFi signal strength, SD card space used, uptime, motion detection status)
- Photo capture and a real MJPEG-in-AVI video recorder, both saving straight to SD
- Byte-difference motion detection with automatic snapshot saving
- A live video feed with a built-in safety timeout
- Per-file and delete-all file management, so the card never needs to be physically removed
- An Emergency Stop button that cleanly halts recording and motion detection without a reboot
- A Restart button for a full clean reboot when needed, with automatic WiFi reconnection
Full Working Code: Copy-Paste and Flash
Here’s the complete sketch with every fix from this post already applied — the PSRAM handling, the SD pull-up workaround, the AVI writer, motion detection, and the timeout-protected live stream. Fill in your WiFi credentials, upload with the board settings noted in the comments, and open the printed IP address in a browser.
🔗xiao_esp32s3_camera_dashboard.ino
What I’d Do Differently Next Time
A few honest takeaways from the whole process:
- Don’t trust a Tools menu setting until you’ve erased flash once. Stale builds are a more common cause of “it’s not working” than actual hardware faults.
- A working SD card and a mount failure aren’t contradictory on this particular board — pull-up bias on the fixed pins is a real, specific thing to check before assuming anything else is wrong.
- Any indefinite loop waiting on a network client needs its own timeout. Never assume the other side will always tell you when it’s done.
- Character encoding is invisible until it isn’t. One meta tag saves a confusing afternoon.
Where This Could Go Next
A few natural next steps if you’re extending this yourself:
- Time-lapse mode, capturing a frame on a fixed interval for long-duration monitoring
- Cloud backup, pushing captured files somewhere off the card automatically when WiFi is available
- Battery + deep sleep, since the board’s small footprint makes it a natural fit for a LiPo cell and a wake-on-motion cycle instead of running continuously
Frequently Asked Questions
Why does the SD card mount fail on the XIAO ESP32S3 Sense even with a good, properly formatted card?
The most common cause is the onboard SD_MMC pins (CLK, CMD, D0) not getting reliable internal pull-up bias by default. Explicitly setting INPUT_PULLUP on GPIO7, GPIO9, and GPIO8 and remapping them with SD_MMC.setPins() resolves it in most cases.
Why does the camera fall back to a lower resolution even with PSRAM enabled in the Tools menu?
This is usually a stale build rather than an actual hardware issue. Enable Tools > Erase All Flash Before Sketch Upload once, upload, then switch it back off.
Can the ESP32-S3 actually record real video?
Not with hardware compression like MP4. What’s possible — and what this project does — is capture a stream of JPEG frames and package them into an MJPEG-in-AVI file, which plays normally in VLC and most media players.