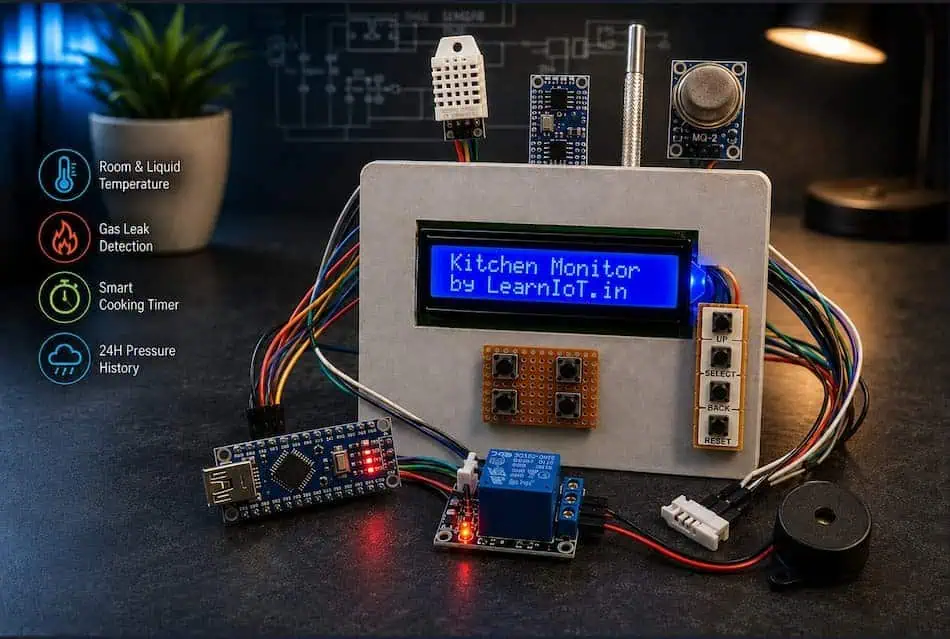
Just an Arduino Nano, Yet a Fully Smart Kitchen: Liquid, Gas & Timer in One Build
Here’s a slightly contrarian opener: not every “smart” project needs a radio.
Scroll through enough Arduino project write-ups and a pattern emerges — ESP32, an MQTT broker, a phone app, a cloud dashboard, and only then does the thing start actually doing something useful. Wi-Fi has quietly become the default assumption, almost a reflex, even for projects that never needed to talk to the internet in the first place.
This build breaks that pattern, deliberately.
It’s a plain Arduino Nano, a 16×2 LCD, and four sensors sitting on a kitchen counter — nothing else — and it still pulls its full weight: tracking room conditions, catching a gas leak before it becomes dangerous, watching whatever’s boiling on the stove, running a fully configurable cooking timer, and generating a rough rain forecast from 24 hours of pressure-trend data it logs entirely on its own hardware. No cloud. No app. No account to create. No firmware update six months from now that quietly breaks your dashboard because a third-party API changed. Just a small, self-contained box that does its job, indefinitely, without asking anything of the internet.
That’s not a corner cut. It’s an engineering decision — and it holds up under a fairly obvious question: does this project actually need Wi-Fi to be useful? For a kitchen timer that watches gas and liquid temperature, the honest answer is no. So it doesn’t have any.
Why offline wins here: the Nano-vs-NodeMCU numbers
If “smart” doesn’t automatically mean “connected,” the next question is a practical one — why build this on a Nano specifically, instead of the more fashionable ESP32 or ESP8266?
Three numbers make the case:
- Size. The Arduino Nano is physically smaller than even a compact NodeMCU ESP8266 board — a real consideration when the whole point is a device that sits unobtrusively on a kitchen counter, not a dev board bolted to the wall.
- Price. A Nano typically runs around ₹160–180. A NodeMCU ESP8266 runs closer to ₹250. That’s the Nano coming in at roughly two-thirds the cost — for a Wi-Fi radio this project was never going to switch on.
- Usable pins. The Nano hands you more GPIO pins that are genuinely safe to load with sensors and buttons. Several ESP8266 pins double as boot-mode straps, which means they come with fine print about what you can and can’t wire to them — fine print that starts to matter fast once you’re driving eight buttons and four sensors off one board.
None of this is an argument against the ESP32 or ESP8266 in general — they’re excellent boards, and the moment a project genuinely needs Wi-Fi, they’re the obvious choice. But plenty of projects don’t: a kitchen timer, a workshop clock, a soil-moisture alarm, this monitor. For that category, reaching for a radio out of habit is arguably the less smart engineering call. A tiny, cheap, pin-generous board that does one job reliably, forever, with nothing to disconnect or re-authenticate — that’s the actual smart part.
What the device actually does
Before getting into wiring and code, here’s the full feature list so the rest of this makes sense:
- Live room temperature, humidity, and barometric pressure on the top line of the LCD, always visible.
- Liquid temperature tracking via a waterproof probe you dip into milk, curry, or oil, with a configurable high-temperature alarm.
- Gas/smoke detection with a configurable threshold, tuned to your own kitchen rather than a fixed guess.
- A flexible cooking timer — pick any duration, not just fixed presets.
- Different alarm behaviour depending on what triggered it — the timer alarm sounds different from a gas or liquid alarm, on purpose.
- A compact icon-based dashboard instead of cramped abbreviations, because “H84%” means nothing to someone glancing at the counter for the first time.
- 24 hours of pressure history logged to EEPROM, with a simple rain-trend estimate.
- Automatic fault detection — if a sensor starts feeding garbage, the system notices, switches it off on its own, and leaves you a message about it.
Hardware overview
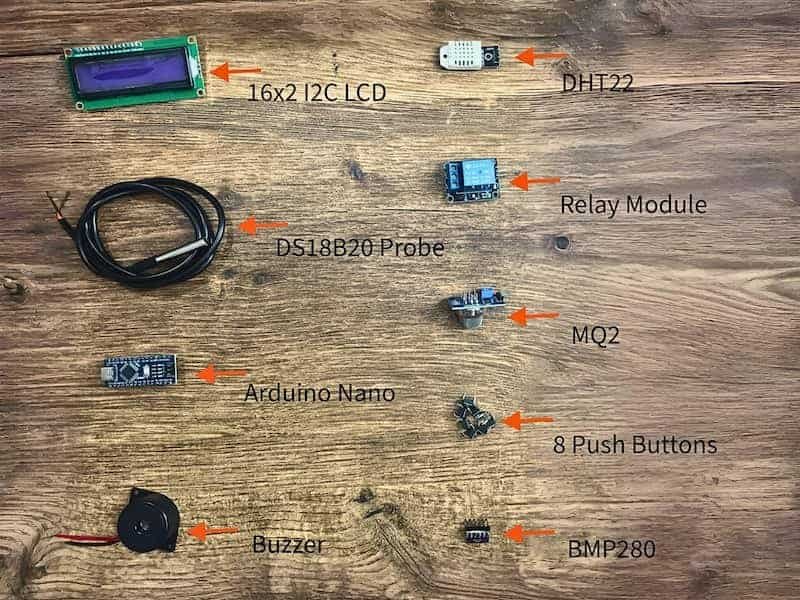
The core parts list is short and all fairly standard hobbyist gear:
- Arduino Nano (classic 5V version) as the controller.
- DHT22 for room temperature and humidity.
- BMP280 (3.3V, I2C) for barometric pressure and a secondary ambient temperature reading.
- DS18B20 waterproof probe for liquid temperature.
- MQ2 gas sensor for LPG and smoke.
- 16×2 LCD with an I2C backpack for the display.
- A 5V relay driving a small buzzer for the alarm output.
- Eight push buttons — Up, Down, Select, Back, Liquid, Air, Timer, Reset — each wired one leg to a digital pin, the other to GND, using
INPUT_PULLUPso no external resistors are needed.
On power: the Nano, DHT22, DS18B20, MQ2, LCD, and relay all run happily on 5V. The BMP280 is the odd one out — most breakout boards want 3.3V, so double-check yours before wiring it in. All grounds are tied together regardless of voltage rail.
For wiring at a glance: DHT22 data goes to D2, DS18B20 data to D3 (with the usual 4.7kΩ pull-up resistor), the relay control pin to D4, MQ2’s analog output to A0, and the BMP280 plus the LCD share the I2C bus on A4 (SDA) and A5 (SCL) — which is exactly why they need to sit on the same voltage-compatible bus and why address conflicts are worth checking with an I2C scanner sketch if the LCD or pressure sensor doesn’t respond on first boot.
Configuration that survives a power cut
Nothing about this build assumes the kitchen has stable power all day, so anything the user configures — alarm thresholds, which sensors are active — gets written to EEPROM, not just held in RAM.
A Config struct holds the liquid temperature threshold (80°C by default), the gas threshold (600 raw analog by default), and three boolean flags for whether the ambient, liquid, and gas sensors are currently enabled. The trick that makes this reliable across first boots and blank EEPROM chips is a “magic byte” — a fixed value written alongside the real config data. On startup, the code reads whatever’s in EEPROM and checks that byte. If it doesn’t match, that means this is either a brand-new Nano or the EEPROM was never initialised, so the code writes safe defaults and saves them. From that point on, only an explicit save through the menu overwrites the saved thresholds — a normal power loss and restart just reloads whatever was there before.
The 24-hour pressure history gets the exact same treatment, but as a separate struct with its own magic byte, stored at a different EEPROM address so the two don’t collide.
Sensors that know when they’re lying
Every sensor reading on this device passes through a validity check before the code trusts it — because a sensor quietly returning garbage is arguably worse than a sensor that’s obviously disconnected.
- DHT22 readings are rejected if they come back as
NaN, or if humidity falls outside 0–100%, or temperature falls outside a sane band. - DS18B20 readings are rejected if they match its two classic fault signatures: 85°C (the power-up default before a real reading has been taken) or -127°C (returned when the probe is disconnected).
- MQ2 readings are rejected if the raw value gets stuck dead at exactly 0 or 1023 across several reads in a row — almost always a wiring fault rather than a real “zero gas” or “maximum gas” condition.
Each sensor carries a small SensorHealth struct with a valid flag and an invalidStreak counter. A single bad reading doesn’t matter — sensors glitch occasionally — but once the streak hits a configurable limit, three things happen at once: the sensor is marked invalid, it’s automatically switched off in the saved config (so the Nano stops even bothering to poll it), and a “fault pending” flag gets set so the menu system knows there’s an unread message waiting.
This matters most for the gas sensor. A dead MQ2 stuck reading zero would otherwise look like “perfectly safe air” forever, which is a much worse failure mode than the device simply admitting it can’t tell right now.
A dashboard built from icons, not abbreviations
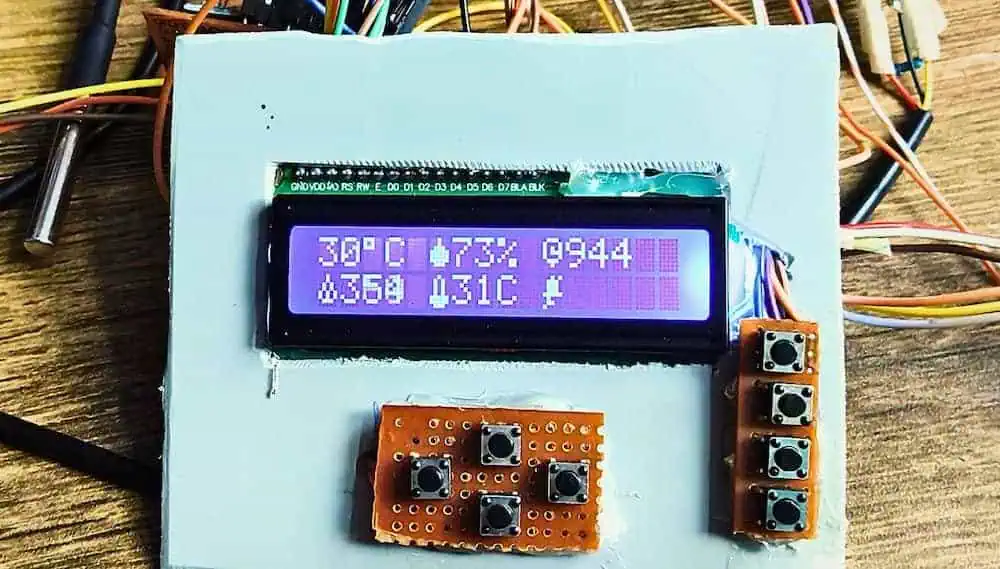
Early versions of this project tried to cram everything onto 16 characters using letter abbreviations, and it was borderline unreadable to anyone who hadn’t built the thing themselves. The fix was custom LCD characters. The Nano’s LCD library supports up to eight custom 5×8 pixel glyphs, and this project uses seven of them: a water droplet for humidity, a small pressure-gauge icon, a flame for gas level, a bell for “timer armed,” the same bell with a diagonal line through it for “no timer set,” a cloud for the rain forecast screen, and a thermometer for liquid temperature.
The top line of the LCD always shows the same thing regardless of what menu you’re in: live ambient conditions, formatted roughly like 29°C [droplet]84% [gauge]942 — temperature in the one place a plain “C” is genuinely unambiguous, then the humidity and pressure values each introduced by their icon instead of a letter.
The bottom line, when the system is just sitting idle, packs in gas status, liquid status, and timer status all at once: the flame icon followed by the current gas reading (or “off” if that sensor’s disabled, or “F” if it’s faulted), the thermometer icon followed by the current liquid temperature, and finally the bell icon — solid if a cooking timer is currently armed, crossed out if it isn’t. If any sensor has an unacknowledged fault, a small ! blinks in the bottom-right corner until you go check the message.
Since a first-time user has no way to guess what a crossed-out bell means, here’s the full legend — it’s also built into the device itself as a “Symbols” menu entry, so you never have to remember it:
| Icon | Looks like | Where you’ll see it | Meaning |
|---|---|---|---|
| Droplet | small water drop | Top line | Room humidity |
| Gauge | dial with a needle | Top line | Barometric pressure |
| Flame | small flame | Bottom line / Air screen | Gas / smoke level |
| Thermometer | bulb-and-stem thermometer | Bottom line / Liquid screen | Liquid temperature |
| Bell | plain bell shape | Bottom line, Countdown, Alarm screens | A cooking timer is currently armed or ringing |
| Crossed bell | bell with a line through it | Bottom line | No cooking timer is currently set |
| Cloud | puffy cloud | Rain Forecast screen | Pressure-trend rain forecast |
The state machine behind the buttons
Under the hood, the whole UI is a single finite state machine. The main states are: DASHBOARD_IDLE, LIQUID_VIEW, LIQUID_CONFIG, AIR_VIEW, AIR_CONFIG, TIMER_SET, COUNTDOWN, ALARM_ACTIVE, REMINDER_MODE, SENSOR_CONFIG, FAULT_VIEW, PRESSURE_VIEW, and SYMBOL_HELP.
Every button read goes through a millis()-based debounce check rather than delay(), since blocking the loop even briefly would stall sensor polling and make the countdown timer inaccurate.
A couple of the button behaviours are worth calling out specifically:
- The Liquid and Air buttons each do double duty. A single press toggles between the idle dashboard and that sensor’s live-reading screen. A quick double press (within about 400ms) jumps straight into that sensor’s config screen instead, where Up/Down adjust the alarm threshold and Select saves it.
- If you’re already sitting on the live-reading screen and press Up or Down directly, the code treats that as “I clearly want to adjust this” and jumps into the config screen automatically, applying that first press as the initial adjustment — no need to remember the double-click step separately.
- The Timer button, pressed from idle, opens
TIMER_SET, where Up/Down step the target duration from 1 to 60 minutes and Select arms it, starting the countdown. - Select, while a timer alarm is ringing, drops the system into
REMINDER_MODE— a beep pattern of one minute on, one minute off, repeating up to ten cycles, so a timer you silence but don’t fully deal with keeps gently nagging you rather than going dead silent. - Back, from idle, opens the
SENSOR_CONFIGmenu. From inside any menu sub-screen, it steps back one level rather than dumping straight to idle — fromFAULT_VIEWit goes back to the menu, not to the dashboard. - Reset is the one button that works from literally any state: it immediately kills any active alarm, clears reminder mode, clears the “timer armed” flag, and — importantly — resets both alarm thresholds back to their factory defaults. That last part exists specifically to stop a stuck-high sensor reading from re-triggering the exact alarm you just cleared half a second later; you re-enter your preferred limit afterwards once things have settled.
Alarms that sound different depending on what’s wrong
One detail that makes a real difference in daily use: the timer alarm and the gas/liquid alarms don’t sound the same, on purpose. A timer finishing is a “come deal with your food” event — the relay just holds the buzzer on continuously (or, in reminder mode, in slow one-minute pulses) until you respond.
A gas or liquid alarm is a “something’s actually wrong right now” event, so it gets a more attention-grabbing, unmistakably different pattern: three short beeps, a brief pause, then three more beeps, repeating for as long as the condition persists. That pattern lives in a small lookup array of on/off durations, advanced every loop iteration by comparing the current time against a scheduled next-toggle time — the same non-blocking approach used everywhere else in the sketch, so the beep pattern runs smoothly without ever stalling sensor reads or button checks.
The logic that decides which alarm fires is refreshingly simple: on every sensor read cycle, the current liquid temperature is compared against the saved liquid threshold, and the current gas reading against the saved gas threshold. If either crosses its line, the system moves into ALARM_ACTIVE, records which one triggered it, and starts that source’s specific alarm behaviour.
The menu: sensors, messages, forecast, and a symbol legend
Pressing Back from the idle dashboard opens a menu you scroll through with Up/Down, containing six entries: Ambient, Liquid, Gas, Messages, Rain Fcst, and Symbols.
The first three let you individually switch a sensor on or off — genuinely useful if a sensor is missing from your parts bin or has failed and you don’t have a replacement on hand yet. Turning a sensor back on after fixing it also quietly resets its fault streak and clears any pending message, giving it a clean second chance rather than immediately flagging it faulty again from stale history.
Messages opens FAULT_VIEW, where Up/Down cycle through the three sensor categories and the screen tells you plainly whether each one is fine or currently reporting “FAULT!” Pressing Select acknowledges and clears that specific message — separate from actually re-enabling the sensor, since acknowledging “yes, I saw the gas sensor died” and “yes, I’ve physically fixed it and want it back on” are two different actions.
Rain Fcst opens the pressure-trend screen, covered in more detail below.
Symbols is a small built-in legend — since a first-time user has no way to intuit that a bell with a line through it means “no timer set,” this screen steps through all seven custom icons one at a time with Up/Down, printing the icon next to a plain-English description of what it means.
Twenty-four hours of pressure history and a rough rain forecast
This is the feature that turns the BMP280 from “a slightly more accurate thermometer” into something genuinely useful on its own. Every 30 minutes, the current pressure reading gets pushed into a circular buffer of 48 samples — enough to cover a full rolling 24-hour window. Once the buffer fills, the oldest sample is simply overwritten by the newest one, so there’s no manual cleanup needed and EEPROM usage stays fixed regardless of how long the device has been running.
Working out a trend from that buffer is straightforward: find the oldest and newest samples currently stored, work out how many hours separate them based on the known 30-minute sampling interval, and divide the pressure difference by that time span to get a rate in hectopascals per hour. A steady, meaningful drop gets mapped to a rough forecast window — something like “rain in 3 to 6 hours” for a fast drop, “6 to 12 hours” for a moderate one, and “12 to 24 hours” for a slow, gradual one. A rising trend shows as “clearing,” and anything too flat to call either way just shows “stable.”
Inside PRESSURE_VIEW, the default screen shows that forecast text next to the cloud icon. Pressing Up or Down switches to a second view showing the minimum and maximum pressure recorded across the current 24-hour window — something like “Lo993 Hi1012” — useful context on its own even without a forecast attached to it.
One honest limitation worth stating plainly: this build has no real-time clock. It doesn’t know how long the power was actually off after an outage — it simply resumes logging from wherever the buffer left off once it’s back on. That’s good enough for a same-day rough estimate, not a substitute for an actual weather service.
Safety notes worth taking seriously
This is a DIY helper, not a certified safety appliance, and it’s worth treating it that way. MQ2-class sensors are early-warning devices — they’ll react to cooking steam and smoke just as readily as an actual LPG leak, which is exactly why the gas threshold here is left for you to tune against your own kitchen’s normal baseline rather than being a fixed number pulled from a datasheet. Spend a few days watching the raw gas reading during ordinary cooking before locking in a limit you trust.
One more MQ2 quirk worth knowing: the sensor has a small internal heater that needs a couple of minutes to reach a stable operating temperature after power-on. During that warm-up window, its raw reading can swing around and often looks artificially high — enough to look like a gas spike on a sensor that’s actually fine. The firmware accounts for this with a short grace period after boot during which the gas alarm won’t fire, even if the raw number briefly looks alarming; the reading itself is still visible on the LCD the whole time, only the alarm is held back until the sensor settles.
The automatic fault-detection and sensor-disable behaviour exists for a specific reason: a broken sensor that silently keeps reporting “all clear” is a worse failure mode than no sensor at all, because it actively hides the fact that you’re not being monitored anymore. And the decision to have Reset also restore default thresholds isn’t cosmetic — without it, a genuinely still-dangerous reading would just re-trigger the alarm the instant you tried to clear it, which in practice trained people to distrust the reset button entirely.
Using it day to day
The normal flow looks something like this: you put milk on to boil, dip the DS18B20 probe in, and set a 10-minute timer. You walk off to do something else. The top line keeps showing room conditions the whole time; the bottom line quietly tracks gas level, liquid temperature, and the fact that a timer is armed. If the gas or liquid threshold gets crossed at any point, the distinctive triple-beep pattern kicks in and the LCD tells you exactly which one fired. When the timer itself finishes, it’s a different, continuous tone — no ambiguity about which kind of attention you need to pay it.
Leave the thing running for a few days and the pressure-forecast screen starts giving you genuinely useful hints, not because it’s doing anything clever meteorologically, but because a steady multi-hour pressure drop is a real, physically meaningful early rain signal, and now it’s one your kitchen counter can tell you about.
Where this could go next
The Nano-and-LCD version is deliberately self-contained, but the obvious next step is porting the same logic onto an ESP32 and mirroring the dashboard to a small web page — same icons, same state machine, just reachable from a phone. From there, Wi-Fi notifications on a gas or liquid alarm firing become a natural addition, especially useful for anyone who isn’t standing in the kitchen when it happens. The sensor-health pattern used here — a read() step, a validity check, an enabled flag, and an auto-disable-on-repeated-failure path — also generalises cleanly to any sensor you’d want to bolt on later, whether that’s a flame sensor, a door contact, or something else entirely.
Get the Full Arduino Sketch
Everything described above — the icon dashboard, EEPROM-backed config, sensor fault detection, the beep patterns, the 24-hour pressure log — lives in one sketch file. Grab it, open it in the Arduino IDE, install the libraries listed in the Hardware section, and adjust the pin constants at the top if your wiring differs from the layout described here.
Download kitchen_environment_monitor.ino
FAQ
Does this need Wi-Fi or an app to work?
No. It’s fully offline by design — everything runs on the Nano itself and shows up on the LCD, with no phone, router, or account needed.
Why not just use an ESP32 or ESP8266 since they’re more “modern”?
Because this project never needed internet connectivity in the first place. The Nano is smaller, meaningfully cheaper, and has more genuinely free GPIO pins for driving multiple sensors and buttons safely — advantages that only matter when you’re not paying for a Wi-Fi radio you’ll never use.
Can I use a DHT11 instead of a DHT22?
Yes, the wiring is identical, but expect noticeably less accurate humidity readings — that’s specifically why DHT22 was chosen here. If you want to work with the DHT11, see our DHT11 temperature and humidity guide for the sensor, wiring, Arduino setup, and troubleshooting.
How accurate is the rain forecast, really?
It’s a rough heuristic based on how fast pressure is falling or rising over the last 24 hours, not a meteorological model. Treat “rain in 3–6h” as a helpful hint, not a guarantee.
What happens to my settings if the power goes out?
Your alarm thresholds, sensor on/off states, and pressure history all live in EEPROM, so they survive a power cut and pick up right where they left off.
Is the MQ2 sensor a certified gas leak detector?
No — treat it strictly as an early-warning helper. It reacts to cooking smoke and steam as well as genuine LPG, which is exactly why the threshold is left for you to tune to your own kitchen rather than fixed in code.
What happens if a sensor breaks or I unplug one?
The system detects several consecutive bad readings, automatically switches that sensor off, and leaves an unread message you can check from the menu. You can also manually turn a sensor off yourself if you know it’s missing or unreliable.
Roughly what does this build cost in parts?
The Nano itself is the cheapest part of the bill of materials — most of the cost is in the sensors (DHT22, BMP280, DS18B20, MQ2) and the LCD, all of which are common, inexpensive hobbyist modules.
Why did my gas alarm go off right after I powered the device on?
That’s almost certainly the MQ2’s heater warming up, not a real gas reading — it can take a couple of minutes to settle after power-on. The firmware holds off the gas alarm for a short grace period right after boot specifically to avoid this; if you still see a false alarm in the first few minutes, the grace period can simply be extended in the code.